
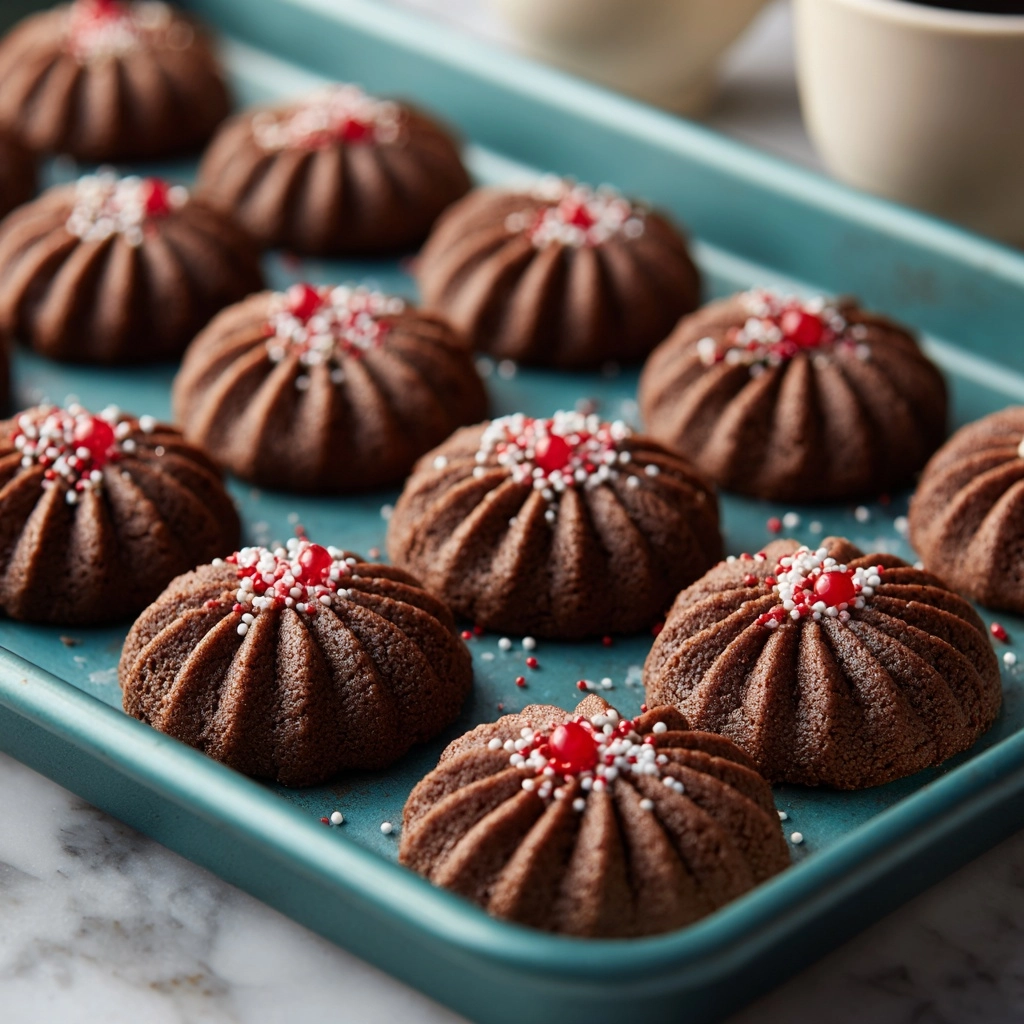
If you’re on the hunt for a cookie that’s as fun to make as it is delicious to eat, Piped Chocolate Butter Cookies are about to become your new obsession. These stunning cookies have that picture-perfect, swirled finish with a buttery chocolate flavor that simply melts in your mouth. The secret is all in the piping: it’s the key to those beautiful shapes and the melt-in-your-mouth texture. Whether you serve them plain, dunked in chocolate, or showered in sprinkles, these cookies are a guaranteed crowd-pleaser. Gather your ingredients and let’s make a batch of Piped Chocolate Butter Cookies you’ll want to share with everyone (if you don’t eat them all yourself first!).
Ingredients You’ll Need
With just a handful of classic baking staples, you’ll be amazed at how easy it is to create Piped Chocolate Butter Cookies that look like they came straight from a fancy bakery. Each ingredient, though simple, plays a vital role in creating that signature tender crumb and rich chocolate flavor.
- Unsalted butter (1 cup, softened): Gives the cookies their irresistible buttery flavor and silky texture. Start with room-temperature butter for the best results.
- Powdered sugar (2/3 cup): Dissolves beautifully into the dough, creating a smooth, melt-in-your-mouth sweetness.
- Vanilla extract (1 teaspoon): Adds warmth and depth that complements the chocolate so well.
- Salt (1/4 teaspoon): Just a touch to balance the sweet and brighten all the other flavors.
- All-purpose flour (1 1/4 cups): Forms the delicate structure of the cookies without making them cakey.
- Unsweetened cocoa powder (1/4 cup): Provides rich, chocolatey flavor and that beautiful deep color.
- Cornstarch (1 tablespoon): Softens the crumb, making your cookies even lighter and more tender.
- Milk (2–3 tablespoons, as needed): Adjusts the dough’s consistency so it’s soft enough to pipe but still holds its shape.
- Melted chocolate or sprinkles for dipping (optional): The perfect finishing touch for those who love their cookies extra special.
How to Make Piped Chocolate Butter Cookies
Step 1: Cream the Butter and Sugar
Let’s kick things off with the heart of all great butter cookies: that creamy, dreamy combination of butter and sugar. Beat your softened butter and powdered sugar together in a large bowl until the mixture looks pale and really fluffy. This step takes just a few minutes but makes all the difference in giving your Piped Chocolate Butter Cookies their luxurious texture and delicate crumb. Stir in the vanilla extract and salt to infuse every bite with flavor.
Step 2: Sift and Mix Dry Ingredients
Grab a sifter or fine mesh sieve, because it’s time for the flour, cocoa powder, and cornstarch. Sifting ensures your dough stays light, with no stray lumps. Gently fold these dry ingredients into your butter mixture, mixing until just combined. At this stage, the dough should be soft and a bit sticky, but if it’s too stiff to pipe, you’re about to fix that in the next step.
Step 3: Adjust Dough Consistency
This is the magic trick to perfect Piped Chocolate Butter Cookies: add the milk one tablespoon at a time until your dough is soft and pipeable, but not wet. It should be thick enough to hold a shape, but not so stiff it clogs your piping bag. If you ever feel resistance when piping, just let the dough warm a bit more at room temp or trickle in another spoon of milk.
Step 4: Pipe the Cookies
Spoon the dough into a sturdy piping bag fitted with a large open star or round tip. The classic rosettes are always stunning, but you can get creative and pipe lines, S-shapes, or even little “kisses.” Space each cookie slightly apart on your parchment-lined baking sheet so they can bake up individually, not into each other.
Step 5: Bake to Perfection
Preheat your oven to 350°F (175°C) and slide in the baking sheet for about 10–12 minutes. You’re looking for set edges and a soft center (they’ll continue to firm up as they cool). Let them rest on the baking sheet for 5 minutes, then carefully move to a wire rack. Once cool, your Piped Chocolate Butter Cookies are ready for the finishing touch!
Step 6: Decorate (Optional)
Dip half of each cookie in melted chocolate, shower with sprinkles, or leave them plain: the choice is yours! This is a great time to get kids involved, too—it’s impossible not to smile while decorating these cookies.
How to Serve Piped Chocolate Butter Cookies

Garnishes
Add a gourmet touch by dipping your cooled Piped Chocolate Butter Cookies in rich melted chocolate and dusting with chopped pistachios, flaky sea salt, or colorful sprinkles. You can also drizzle them with white or dark chocolate for extra flair. Even a light sprinkle of powdered sugar just before serving gives them a soft, snowy look that’s simply enchanting.
Side Dishes
Nothing complements these cookies more than a hot cup of coffee or tea—especially when enjoyed with friends during a cozy afternoon. For an extra indulgent treat, pair Piped Chocolate Butter Cookies with a small scoop of vanilla ice cream or serve alongside a bowl of fresh berries for a light, fruity contrast.
Creative Ways to Present
Go beyond the ordinary cookie plate by stacking your Piped Chocolate Butter Cookies in a pretty glass jar or arranging them in a tin layered with parchment for gifting. Tie a ribbon around a small bundle for a homemade party favor, or serve them atop an elegant dessert board with dried fruits and nuts for a holiday spread that looks as wonderful as it tastes.
Make Ahead and Storage
Storing Leftovers
To keep your Piped Chocolate Butter Cookies fresh and tender, store them in an airtight container at room temperature. They’ll stay delicious for up to a week—if they last that long! Be sure the chocolate has completely set if you decorated them before stacking to avoid sticking.
Freezing
Piped Chocolate Butter Cookies freeze beautifully, whether you’re freezing the raw dough or the baked cookies. For unbaked cookies, pipe them onto a sheet, freeze until firm, then store in a zip-top bag. Bake off straight from frozen, adding a minute or two to the baking time. If freezing the finished cookies, layer with parchment in an airtight container and thaw at room temperature before enjoying.
Reheating
If you like your cookies a touch warm, zap them in the microwave for 5–10 seconds (just until slightly warmed, not melting). For a crisp texture, you can briefly reheat them in a low oven (about 250°F) for a few minutes. Remember, cookies decorated with chocolate may soften if reheated, so keep an eye on them.
FAQs
Why is my dough too stiff to pipe?
If your dough feels difficult to squeeze through the piping bag, it may be a little too cold or dry. Let it rest at room temperature for a few minutes, then mix in an extra tablespoon of milk until it’s soft enough to pipe smoothly.
Can I use Dutch-processed cocoa instead of natural?
Absolutely! Dutch-processed cocoa will give your Piped Chocolate Butter Cookies a deep, mellow chocolate flavor and even richer color. Either type Dessert.
What can I do if I don’t have a piping bag?
No worries! You can use a large zip-top bag with the corner snipped off, or simply scoop and gently shape the dough with a spoon. You’ll still end up with delicious cookies, with a more rustic appearance.
How do I make sure my cookies hold their piped shape?
The key is getting the dough to the right consistency: soft but not runny. Chilling your piped cookies on the tray for 10–15 minutes before baking will also help them keep those pretty details.
Can I make these gluten-free?
Yes, you can substitute a cup-for-cup gluten-free flour blend for the all-purpose flour. The cookies might turn out slightly more delicate, but they’ll still taste fantastic and keep their piped shape.
Final Thoughts
There’s something incredibly joyful about making a batch of Piped Chocolate Butter Cookies, from swirling the dough to adding your own decorative touches. Whether you keep them all to yourself or share with loved ones, these cookies are truly a treat worth making. Give them a try—you’re in for a melt-in-your-mouth chocolate experience that’s every bit as delightful as it looks!
Print
Piped Chocolate Butter Cookies Recipe
- Prep Time: 20 minutes
- Cook Time: 12 minutes
- Total Time: 32 minutes
- Yield: 30 small cookies
- Category: Dessert
- Method: Baking
- Cuisine: European-Inspired
- Diet: Vegetarian
Description
Delight in these decadent Piped Chocolate Butter Cookies, perfect for any occasion. These rich, buttery cookies are piped into elegant shapes and can be dipped in chocolate for an extra indulgent touch.
Ingredients
Cookie Dough:
- 1 cup unsalted butter, softened
- 2/3 cup powdered sugar
- 1 teaspoon vanilla extract
- 1/4 teaspoon salt
- 1 1/4 cups all-purpose flour
- 1/4 cup unsweetened cocoa powder
- 1 tablespoon cornstarch
- 2–3 tablespoons milk (as needed)
Optional Toppings:
- melted chocolate or sprinkles for dipping
Instructions
- Preheat the oven: Preheat the oven to 350°F (175°C) and line a baking sheet with parchment paper.
- Prepare the dough: In a large mixing bowl, beat the softened butter and powdered sugar until light and fluffy. Add vanilla extract and salt, then sift in the flour, cocoa powder, and cornstarch. Mix until just combined, adjusting with milk if needed.
- Pipe the dough: Transfer the dough to a piping bag fitted with a large tip. Pipe desired shapes onto the baking sheet.
- Bake: Bake for 10–12 minutes until set. Cool on the sheet before transferring to a wire rack.
- Decorate: Once cooled, dip in chocolate or top with sprinkles.
Notes
- If the dough is too thick, let it sit at room temperature or add more milk. Store cookies in an airtight container for up to a week.
Nutrition
- Serving Size: 1 cookie
- Calories: 90
- Sugar: 5g
- Sodium: 25mg
- Fat: 6g
- Saturated Fat: 4g
- Unsaturated Fat: 2g
- Trans Fat: 0g
- Carbohydrates: 9g
- Fiber: 1g
- Protein: 1g
- Cholesterol: 15mg


