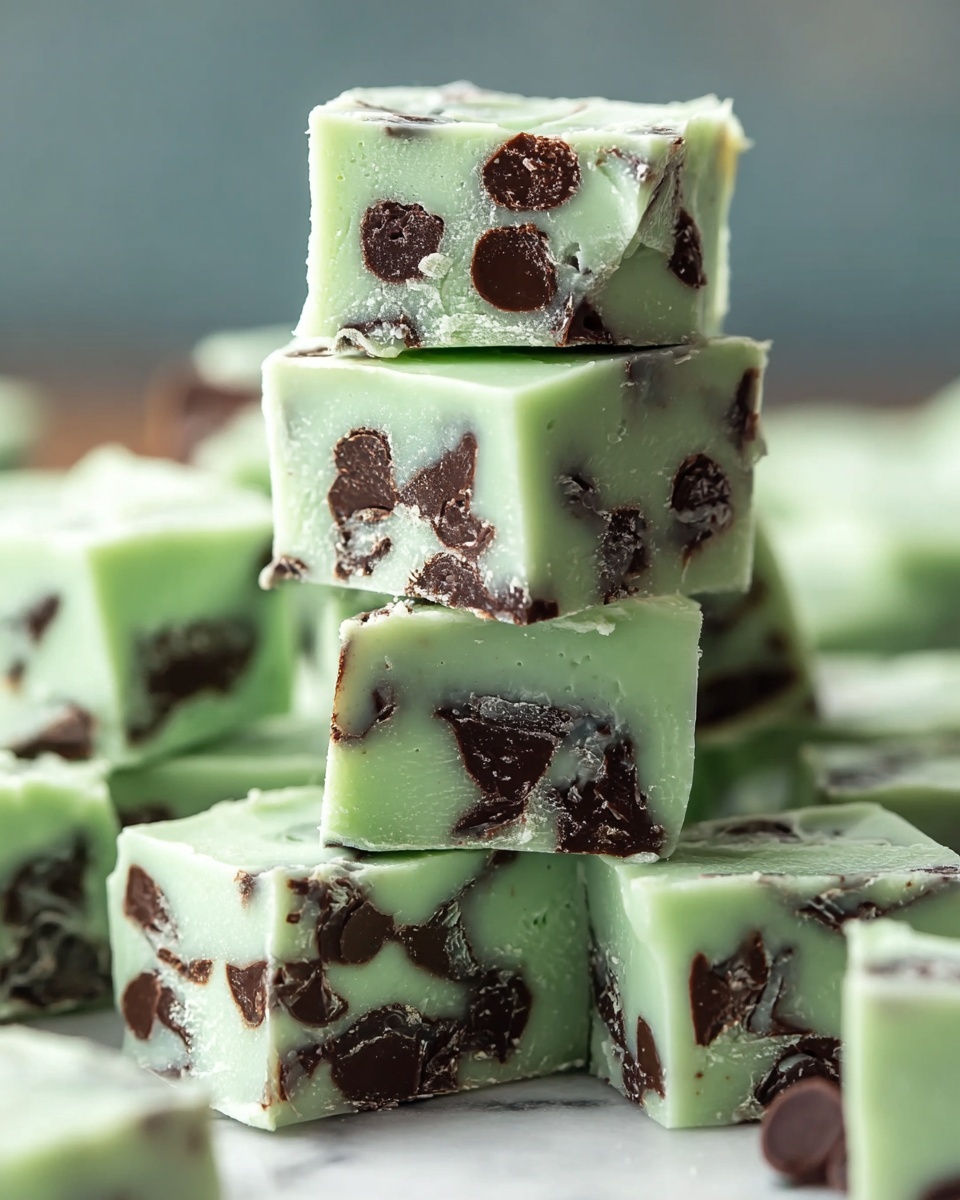
If you’re on the hunt for a melt-in-your-mouth treat that bursts with refreshing mint flavor and creamy sweetness, this Mint Fudge Recipe is the ultimate crowd-pleaser you’ve got to try. It combines the rich decadence of white chocolate with the cool, invigorating taste of peppermint, creating a fudge so smooth and satisfying you’ll find yourself dreaming about it long after the last bite. Whether it’s for a holiday gift or a cozy night in, this recipe delivers that perfect balance of indulgence and freshness in each blissful square.
Ingredients You’ll Need
Before diving into this Mint Fudge Recipe, it’s amazing how just a handful of simple ingredients come together to create such a luscious, festive treat. Each element plays a special role, from adding sweetness and texture to infusing that signature minty zing and a hint of color that makes your fudge truly pop.
- 2 ½ cups white chocolate chips: The creamy base that melts into a smooth, velvety fudge texture.
- 1 (14 oz) can sweetened condensed milk: Provides sweetness and helps the fudge set perfectly without baking.
- 1 tsp peppermint extract (or mint extract): Infuses the fudge with a fresh and bright mint flavor that’s unforgettable.
- ½ tsp vanilla extract: Adds subtle depth and balances the mint’s sharpness with warmth.
- Green food coloring (optional): Gives your fudge that classic minty hue, making it as beautiful as it tastes.
- ½ cup mini semi-sweet chocolate chips: Adds delightful little bursts of chocolate texture and contrast in every bite.
How to Make Mint Fudge Recipe
Step 1: Prepare the Pan
The first step is to line your loaf pan or an 8×8-inch square pan with parchment or wax paper. This little trick makes removing the fudge a breeze when it’s ready, plus it keeps your fudge looking pristine and easy to slice! Leaving an overhang on the sides allows you to lift the entire block out without any hassle.
Step 2: Melt the Base
Combine the white chocolate chips and sweetened condensed milk in a microwave-safe bowl. Heat them carefully in 30-second bursts, giving it a good stir between each interval. This helps the chips melt evenly and prevents burning. Once everything is silky smooth and fully melted, you’re ready for the next flavorful step.
Step 3: Add Flavor and Color
Now the magic happens: stir in the peppermint extract to awaken those refreshing mint notes, followed by vanilla extract to round out the flavor. If you want your fudge to look as festive as it tastes, add a few drops of green food coloring. The color brings that classic Mint Fudge Recipe vibe, making it perfect for holiday treats or just a fun pop of color in your dessert tray.
Step 4: Mix in Chocolate Chips
Gently fold the mini semi-sweet chocolate chips into your mixture. These little gems give the fudge a lovely texture contrast and build on the chocolate-mint love story, turning each piece into a bite-sized delight that’s both creamy and slightly crunchy.
Step 5: Transfer and Set
Pour your luscious mixture into the prepared pan and spread it out into an even layer. Pop it into the refrigerator for at least two hours so it can firm up nicely. The chill time not only lets the fudge set perfectly but also heightens the refreshing mint flavor as it cools.
Step 6: Slice and Serve
Once your fudge has set solid, use the parchment overhang to lift it out of the pan. Slice into squares of your preferred size—smaller bites are great for sharing! And there you have it, perfectly smooth, creamy Mint Fudge Recipe squares that melt in your mouth like a dream.
How to Serve Mint Fudge Recipe
Garnishes
Elevate your fudge presentation by sprinkling crushed peppermint candies or candy canes on top before it sets. A light dusting of edible glitter or a drizzle of dark chocolate can also add a gourmet touch. These little garnish ideas not only look stunning but add an extra layer of texture and flavor bite for bite.
Side Dishes
Mint fudge pairs wonderfully with a cup of hot chocolate or a rich coffee. For a holiday party, serving these alongside a festive cheese board or fresh fruit helps balance the sweetness and pleasantly rounds out your treat spread.
Creative Ways to Present
Wrap individual fudge squares in festive parchment and tie with twine for charming edible gifts. Or, layer them between waxed paper in a decorative tin for a homemade holiday gift that feels heartfelt and personal. Molding the fudge into fun shapes using silicone molds also adds whimsy and encourages guests to indulge happily.
Make Ahead and Storage
Storing Leftovers
Leftover mint fudge stays fresh best when wrapped tightly in plastic wrap or stored in an airtight container. Keep it refrigerated, and it will maintain that creamy texture and minty freshness for up to two weeks—perfect for nibbling on over time or saving for another festive occasion.
Freezing
You can absolutely freeze mint fudge to extend its shelf life. Cut it into portions, wrap each piece well, and place them in a freezer-safe container or bag. When you’re ready to enjoy, let it thaw in the refrigerator for a few hours. The texture holds up wonderfully after freezing, making this recipe excellent for making ahead.
Reheating
Fudge doesn’t typically need reheating, but if you prefer it slightly softer, briefly warming it in your hands or at room temperature will soften it just enough. Avoid microwaving, as the texture can change and become grainy. Gentle warming keeps every bite silky smooth.
FAQs
Can I use dark chocolate instead of white chocolate for this Mint Fudge Recipe?
Absolutely! While white chocolate highlights the mint flavor beautifully, using dark chocolate will give you a richer and slightly more intense fudge. Just keep in mind the flavor balance may shift, and you might want to adjust the peppermint extract amount to taste.
Is it possible to make this fudge vegan or dairy-free?
For a vegan version, you’d need to swap white chocolate chips and sweetened condensed milk for plant-based alternatives, such as coconut condensed milk and vegan white chocolate. The texture might vary slightly, but with the right products, you can create a delightful dairy-free Mint Fudge Recipe.
What’s the best way to cut the fudge into even squares?
Using a sharp knife that’s warmed in hot water and wiped dry between cuts helps create clean edges without crumbly pieces. Chilling the fudge thoroughly before cutting also ensures neat squares that look as good as they taste.
Can I add other flavors or mix-ins to this Mint Fudge Recipe?
Definitely! Crushed nuts, dried cranberries, or bits of peppermint bark make fantastic additions, bringing extra texture and flavor complexity. Just fold them in gently in Step 4 before refrigerating, and get creative!
What if I don’t have peppermint extract on hand? Can I substitute?
If you don’t have peppermint extract, you can use spearmint extract or a few drops of mint-flavored liqueur, though the flavor will differ slightly. Start with less, as mint flavorings can be potent, and adjust to your preference.
Final Thoughts
This Mint Fudge Recipe is one of those irresistible, feel-good treats that’s both easy to make and impossibly delicious. With just a few simple ingredients and minimal effort, you’ll have a batch of creamy, minty fudge squares ready to dazzle friends and family. I hope you enjoy making and sharing this recipe as much as I adore indulging in it!
Print
Mint Fudge Recipe
- Prep Time: 10 minutes
- Cook Time: 0 minutes
- Total Time: 2 hours 10 minutes
- Yield: 24 pieces
- Category: Dessert
- Method: No-Cook
- Cuisine: American
Description
This Mint Fudge recipe is a creamy, no-bake treat that’s easy to prepare and perfect for the holidays or anytime you want a refreshing chocolate-mint dessert. Made with white chocolate, sweetened condensed milk, and a hint of peppermint, this fudge is soft, smooth, and studded with mini semi-sweet chocolate chips for added texture and flavor. The optional green food coloring adds a festive look, making it an ideal sweet to serve at parties or give as homemade gifts.
Ingredients
Fudge Base
- 2 ½ cups white chocolate chips
- 1 (14 oz) can sweetened condensed milk
- 1 tsp peppermint extract (or mint extract)
- ½ tsp vanilla extract
- Green food coloring (optional)
Add-ins
- ½ cup mini semi-sweet chocolate chips
Instructions
- Prepare the Pan: Line a loaf pan or an 8×8-inch square pan with parchment or wax paper, leaving an overhang on the sides so the fudge can be easily lifted out once set.
- Melt the Base: In a microwave-safe bowl, combine the white chocolate chips and the sweetened condensed milk. Microwave the mixture in 30-second intervals, stirring thoroughly after each interval, until the mixture is completely smooth and melted, ensuring no lumps remain.
- Add Flavor and Color: Stir in the peppermint extract, vanilla extract, and if desired, a few drops of green food coloring to achieve a festive color. Mix well to incorporate all flavors evenly throughout the fudge base.
- Mix in Chocolate Chips: Gently fold the mini semi-sweet chocolate chips into the fudge mixture, distributing them evenly without breaking the chips.
- Transfer and Set: Pour the fudge mixture into the prepared pan, spreading it evenly to all edges. Refrigerate for at least 2 hours until the fudge is firm and set completely.
- Slice and Serve: Once the fudge is fully chilled, use the parchment paper overhang to lift it out of the pan. Cut the fudge into approximately 24 squares and serve or store chilled for later enjoyment.
Notes
- Use good quality white chocolate chips for best flavor and smooth melting.
- Microwave in short bursts to avoid burning the chocolate.
- Mint extract can be substituted with peppermint extract or omitted if a milder flavor is desired.
- Green food coloring is optional and intended to give a festive look but does not affect taste.
- This fudge should be stored in the refrigerator to maintain firmness and freshness.
- For a firmer texture, you can chill the fudge overnight.


