
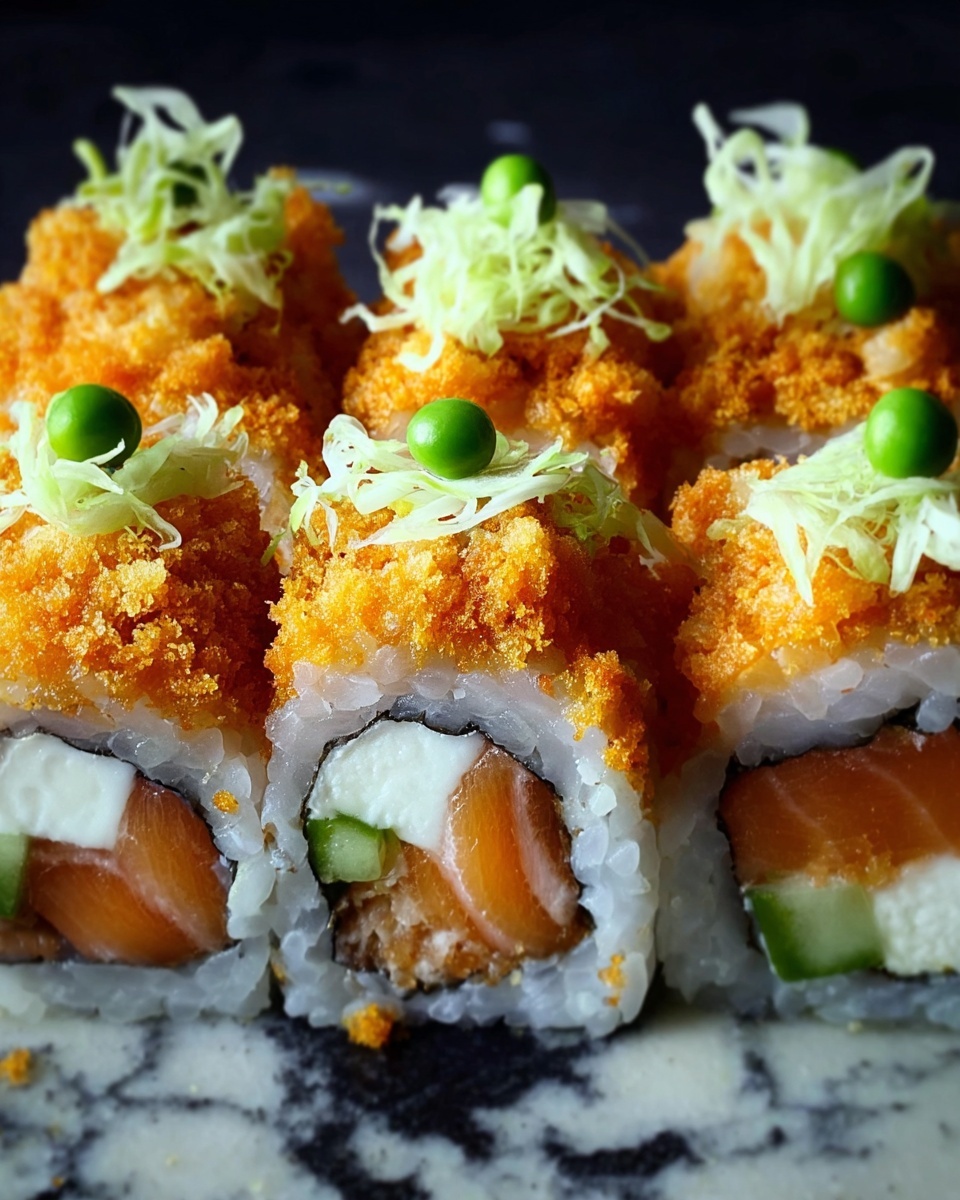
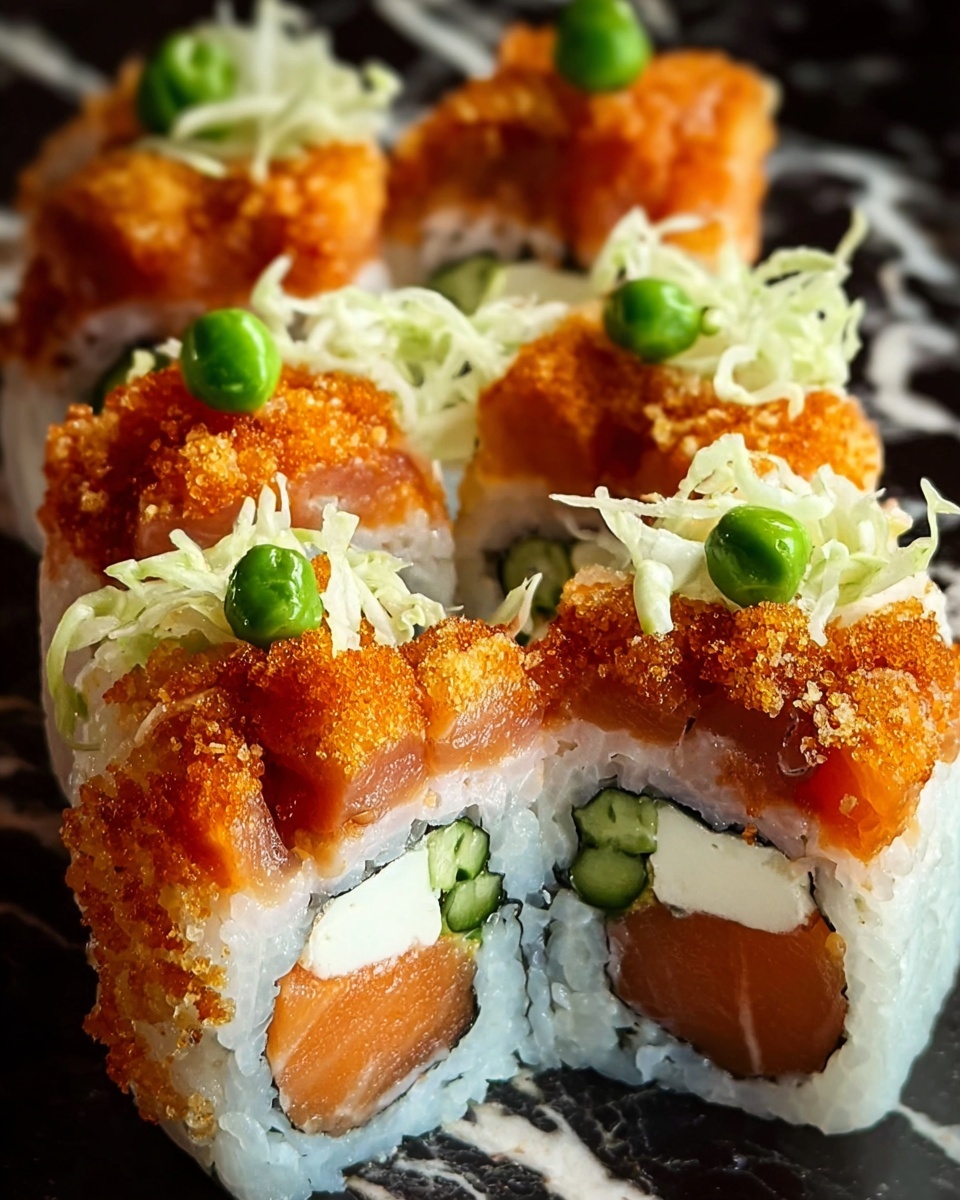
If you have ever dreamed of bringing the vibrant flavors of Japanese cuisine right into your own kitchen, this Crunchy Salmon Roll Recipe is exactly what you need. Combining the tender, melt-in-your-mouth freshness of sushi-grade salmon with the satisfying crunch of tempura flakes and a spicy mayo drizzle, each bite is a delightful explosion of texture and taste. This roll delivers on every level, from the perfectly seasoned sushi rice to the creamy avocado and crisp cucumber, making it a standout dish you’ll want to share with friends and family again and again.
Ingredients You’ll Need
These ingredients are simple yet essential, each playing a crucial role in crafting that perfect balance of flavor, texture, and color that defines a stellar Crunchy Salmon Roll Recipe. From the sticky sushi rice that holds everything together to the fresh salmon and crunchy tempura flakes, every element makes a delicious difference.
- 1 cup sushi rice, cooked and seasoned: Provides the perfect sticky base with a subtle tang from rice vinegar seasoning.
- 4 sheets nori (seaweed): Adds a savory, slightly briny flavor and a sturdy wrapper for the roll.
- 1/2 lb fresh salmon, sushi-grade, thinly sliced: The star of the show; fresh salmon brings silky texture and rich taste.
- 1 cucumber, julienned: Adds refreshing crunch and brightness.
- 1 avocado, sliced: Offers creamy smoothness that balances the other textures.
- 1/4 cup tempura flakes (or crispy fried onions): For the essential crunch that makes this recipe unforgettable.
- 1 tablespoon sesame seeds (optional): Adds a delicate nutty aroma and subtle crunch.
- 2 tablespoons mayonnaise (preferably Japanese Kewpie mayo): Creates a creamy base for the spicy sauce.
- 1 tablespoon sriracha sauce: Brings a gentle spice kick, adjustable to taste.
- 1 teaspoon soy sauce or tamari: Adds a salty depth that enhances all flavors.
- 1 teaspoon sesame oil (optional): Imparts a toasty, rich aroma.
- Chopped scallions or green onions: For a fresh, mild onion bite.
- Extra sesame seeds: To garnish and add extra visual appeal.
- Pickled ginger (optional): A palate cleanser and vibrant accompaniment.
- Soy sauce for dipping: The perfect finishing touch to boost every bite.
How to Make Crunchy Salmon Roll Recipe
Step 1: Prepare the Sushi Rice
Rinsing your sushi rice is a vital step to remove excess starch and ensure that perfect sticky yet fluffy texture. Rinse under cold water until the water runs clear, then cook the rice according to your package instructions or in a rice cooker. Once cooked, gently mix in your seasoned rice vinegar made from rice vinegar, sugar, and salt. Let the rice cool to room temperature—this sets the foundation for your roll.
Step 2: Make the Spicy Sauce
While your rice cools, whisk together the mayonnaise, sriracha, soy sauce, and optional sesame oil into a smooth, spicy sauce. This creamy, fiery blend will later coat the roll and elevate the flavors to irresistible heights.
Step 3: Assemble the Roll
Lay out a bamboo sushi mat and place a sheet of nori shiny side down on top. Wet your hands lightly to prevent sticking, then spread a thin, even layer of the seasoned sushi rice across the nori, leaving about an inch at the top edge free. This little border helps seal your roll.
Step 4: Layer the Fillings
Place thin slices of fresh salmon along the center of the rice, then top with julienned cucumber and creamy avocado slices. These layers bring a delightful blend of flavors and textures, each enhancing the next.
Step 5: Roll It Up Tight
Using the bamboo mat, carefully roll the sushi away from you, pressing firmly but gently to ensure a tight roll. Moisten the bare edge of the nori with water to seal everything perfectly together.
Step 6: Add the Crunch
Spread a thin layer of the spicy mayo sauce over the top of your rolled creation. Then, generously sprinkle the tempura flakes or crispy fried onions for that signature crunch that truly sets this Crunchy Salmon Roll Recipe apart.
Step 7: Slice and Garnish
With a very sharp knife, slice the roll into bite-sized pieces. To prevent sticking, dip your knife in water between cuts. Finish by garnishing with sesame seeds, chopped scallions, and an extra drizzle of spicy sauce if you like. Serve alongside soy sauce for dipping and pickled ginger for refreshment.
How to Serve Crunchy Salmon Roll Recipe
Garnishes
Fresh garnishes like extra sesame seeds, chopped scallions, and a drizzle of spicy mayo not only brighten the look of your rolls but add layers of flavor and texture. Pickled ginger on the side acts as a palate cleanser, creating balance with the richness of the salmon and creaminess of the avocado.
Side Dishes
Compliment your Crunchy Salmon Roll Recipe with light sides such as a simple seaweed salad, edamame sprinkled with sea salt, or a bowl of clear miso soup. These light accompaniments keep the meal balanced and help highlight the sushi’s delicate flavors.
Creative Ways to Present
For an eye-catching presentation, try arranging your sushi pieces in a circular pattern on a large platter, garnished with colorful edible flowers or thinly sliced radishes. Serving with cute ramekins of dipping sauces adds charm and makes the dining experience even more special, perfect for entertaining guests or a fun family dinner.
Make Ahead and Storage
Storing Leftovers
If you have any leftovers, store them in an airtight container in the refrigerator and consume within 24 hours for the best texture and freshness. Keep in mind that the crunchy tempura flakes may soften over time, so add those just before serving when possible.
Freezing
Freezing is not recommended for sushi rolls, especially those with fresh salmon and avocado, as freezing can ruin the texture and flavor. For best results, enjoy this Crunchy Salmon Roll Recipe fresh.
Reheating
Because sushi is best served fresh and often eaten cold, reheating is generally not advised. However, if you prefer a warmer bite, gently warming the spicy mayo sauce can add comfort without affecting the rice and fish. Avoid microwaving the entire roll, as it will degrade the textures dramatically.
FAQs
Can I use cooked salmon instead of raw for this Crunchy Salmon Roll Recipe?
Absolutely! If you’re not a fan of raw fish, cooked salmon works well too—it offers a different but equally delicious flavor and texture. Just be sure to use well-cooked, flaky salmon and keep other fresh fillings for balance.
What can I substitute for tempura flakes if I can’t find them?
If tempura flakes aren’t available, crispy fried onions make a fantastic alternative that adds a similar satisfying crunch and a touch of sweetness. You could also try crushed crispy rice cereal as a fun experiment!
How do I prevent the sushi rice from sticking to my hands?
Keep a small bowl of water nearby and wet your hands lightly before handling the rice. This simple trick prevents sticking and makes spreading the rice evenly much easier.
Is it okay to use regular mayonnaise instead of Japanese Kewpie mayo?
You can substitute regular mayonnaise if that’s what you have on hand, but Kewpie mayo has a slightly sweeter and richer taste that complements sushi rolls beautifully. Adding a touch of sugar to regular mayo can help mimic that flavor.
How spicy is this Crunchy Salmon Roll Recipe?
The spiciness level is quite mild and adjustable! The amount of sriracha sauce can be increased or decreased according to your heat preference, making this recipe versatile for all spice tolerance levels.
Final Thoughts
Making this Crunchy Salmon Roll Recipe at home is such a rewarding experience—it brings a fun, hands-on element to your cooking while delivering a restaurant-quality sushi roll that’s bursting with flavor, texture, and freshness. Whether you’re hosting a sushi night or just treating yourself, this recipe is sure to become a favorite in your culinary repertoire. So grab your bamboo mat and dive in; amazing sushi awaits!
Print
Crunchy Salmon Roll Recipe
- Prep Time: 15 minutes
- Cook Time: 15 minutes
- Total Time: 30 minutes
- Yield: 4 rolls (4-6 pieces per roll, depending on slicing thickness)
- Category: Sushi
- Method: No-Cook
- Cuisine: Japanese
- Diet: Low Fat
Description
This Crunchy Salmon Roll recipe is a delicious homemade sushi roll featuring fresh sushi-grade salmon, crisp cucumber, creamy avocado, and a zesty sriracha mayo sauce topped with crispy tempura flakes for a satisfying crunch. Perfect for sushi lovers looking to recreate the fresh flavors and textures of their favorite roll in the comfort of their own kitchen.
Ingredients
Sushi Rice
- 1 cup sushi rice, cooked and seasoned with 2 tablespoons rice vinegar, 1 tablespoon sugar, and 1/2 teaspoon salt
Roll Ingredients
- 4 sheets nori (seaweed)
- 1/2 lb fresh salmon, sushi-grade, sliced into thin strips
- 1 cucumber, julienned
- 1 avocado, sliced
Crunchy Topping & Sauce
- 1/4 cup tempura flakes (or crispy fried onions for an alternative)
- 1 tablespoon sesame seeds (optional)
- 2 tablespoons mayonnaise (preferably Japanese Kewpie mayo)
- 1 tablespoon sriracha sauce (adjust to your spice preference)
- 1 teaspoon soy sauce or tamari
- 1 teaspoon sesame oil (optional)
- Chopped scallions or green onions
- Extra sesame seeds, for garnish
Serving
- Pickled ginger (optional)
- Soy sauce for dipping
Instructions
- Prepare the Sushi Rice: Rinse the sushi rice under cold water until the water runs clear to remove excess starch, ensuring perfect texture.
- Cook the Rice: Cook the rinsed rice according to the package instructions or using a rice cooker for consistent results.
- Season the Rice: While the rice is hot, gently mix in the seasoned rice vinegar made from rice vinegar, sugar, and salt. Allow the rice to cool to room temperature before assembling.
- Make the Sauce: In a small bowl, whisk together mayonnaise, sriracha sauce, soy sauce, and sesame oil until smooth. Set aside for later use.
- Lay the Nori Sheet: Place a bamboo sushi mat on a clean surface and lay one sheet of nori on it with the shiny side facing down.
- Spread the Rice: Wet your hands to prevent sticking. Spread an even layer of cooled sushi rice over the nori, leaving a 1-inch border at the top edge.
- Add Salmon: Arrange a few thin strips of fresh salmon along the center of the rice layer.
- Add Vegetables: Place julienned cucumber and sliced avocado carefully on top of the salmon strips.
- Roll the Sushi: Using the bamboo mat, tightly roll the sushi from the bottom edge, applying gentle pressure and sealing the top border with a little water to secure the roll.
- Apply Sauce: Spread a thin, even layer of the prepared sriracha mayo sauce on top of the rolled sushi for flavor and moisture.
- Add Crunchy Topping: Sprinkle tempura flakes or crispy fried onions over the sauce layer to add a crunchy texture.
- Slice the Roll: Use a sharp knife dipped in water to slice the roll into bite-sized pieces without crushing it.
- Garnish: Sprinkle sesame seeds and chopped scallions over the sliced rolls, and optionally drizzle extra sauce for enhanced flavor.
- Serve: Present the sushi rolls with soy sauce, pickled ginger, and wasabi on the side for dipping and garnishing.
Notes
- Use sushi-grade salmon to ensure freshness and safety when consuming raw fish.
- Wet your hands or knife with water to prevent rice from sticking during rolling and slicing.
- If you prefer less spice, adjust the amount of sriracha or omit it entirely.
- Tempura flakes add authentic crunch but can be substituted with crispy fried onions for an easier alternative.
- Store leftover sushi rolls wrapped tightly in plastic wrap and consume within 24 hours for best taste.
- For gluten-free options, use tamari instead of regular soy sauce.


