
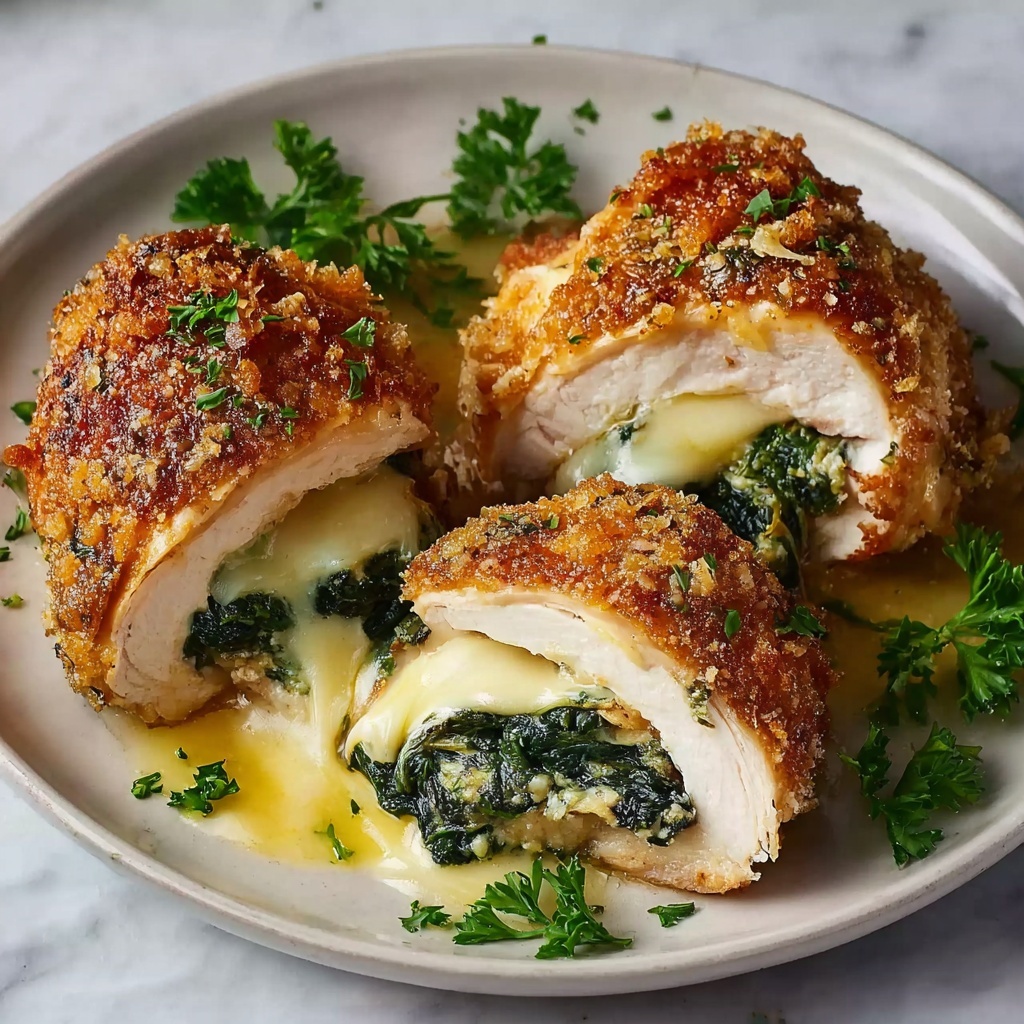
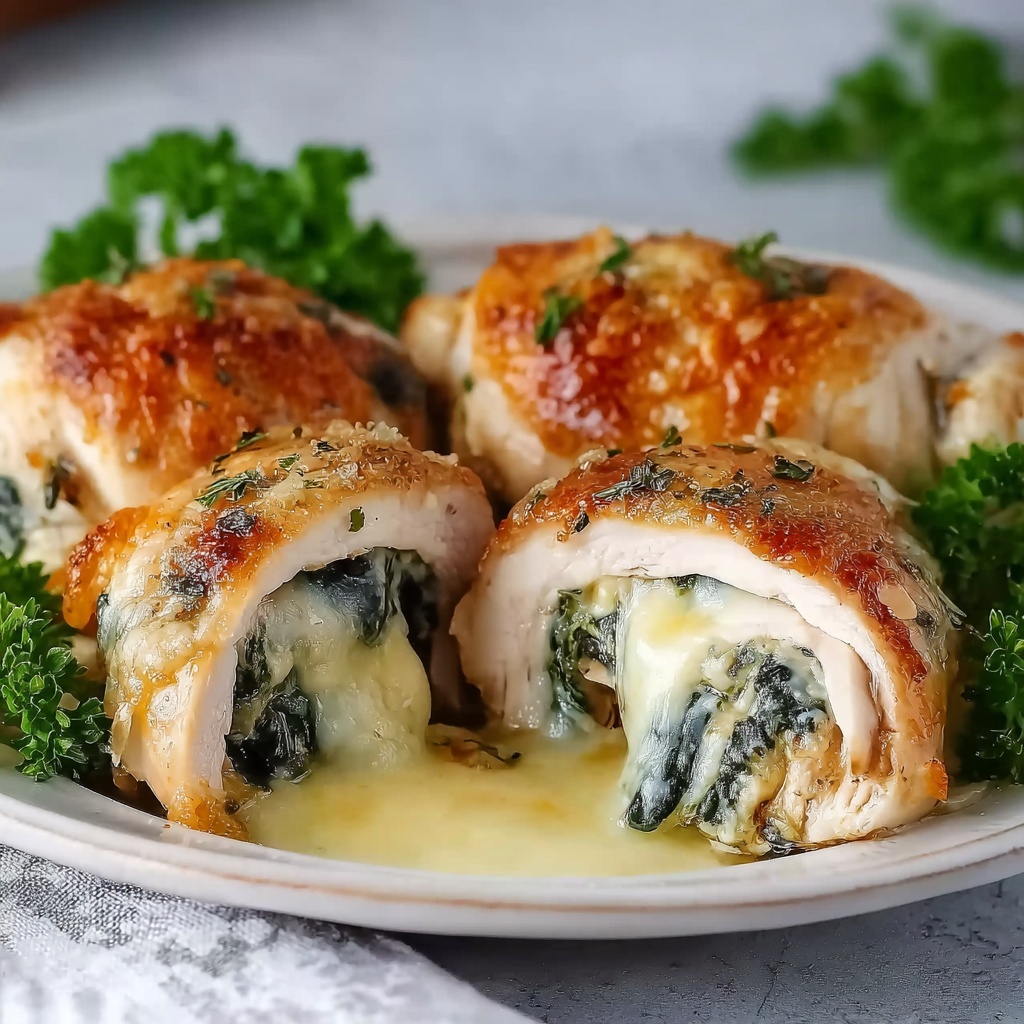
If you’ve ever dreamed of biting into a crispy, golden crust that bursts open to reveal a rich, garlicky herb butter filling, then this Chicken Kiev Recipe is your new best friend. This classic dish masterfully combines tender chicken breast with vibrant fresh herbs and a luscious buttery center that oozes out in every bite. It’s an absolute showstopper that feels special enough for guests but is surprisingly easy to make at home. Trust me, once you try this Chicken Kiev Recipe, it will become one of your favorite dishes to prepare and share again and again.
Ingredients You’ll Need
The magic of this Chicken Kiev Recipe comes from its simple yet essential ingredients. Each one plays a crucial role: fresh herbs add brightness, butter brings richness, and a crisp breadcrumb crust offers that perfect crunch everyone loves.
- Unsalted Butter: Using softened butter lets you easily mix in herbs and shape the filling for that melt-in-your-mouth center.
- Garlic: Fresh minced garlic is vital for that bold, aromatic punch that defines the flavor.
- Fresh Parsley and Dill (optional): They brighten the butter with a fresh, green note, making every bite lively and fragrant.
- Lemon Juice: Adds a subtle tang to balance the richness of the butter and chicken.
- Chicken Breasts: Boneless and skinless breasts are perfect for pounding thin and rolling up the butter inside.
- Seasonings (Salt, Black Pepper, Paprika): Essential for seasoning the chicken and breadcrumbs, enhancing every layer of flavor.
- All-Purpose Flour, Eggs, Breadcrumbs: These three create the irresistible golden, crispy coating that locks in moisture and butter.
- Vegetable Oil: For frying to a perfect, crunchy finish without overpowering flavors.
How to Make Chicken Kiev Recipe
Step 1: Make the Garlic Herb Butter
Start by blending the softened unsalted butter with minced garlic, freshly chopped parsley, optional dill, a splash of lemon juice, salt, and pepper. This luscious, fragrant butter is the soul of the dish. Shape it into a log using plastic wrap and chill until firm. This step is a must because a well-chilled butter log makes it easier to stuff the chicken without losing any precious filling.
Step 2: Prepare the Chicken
Next, take the chicken breasts and gently pound them between plastic sheets until they’re about a quarter-inch thick. This not only tenderizes the meat but gives you the perfect canvas to wrap around the butter. Season both sides liberally with salt, pepper, and a dash of paprika for a subtle smoky warmth.
Step 3: Stuff the Chicken
Cut the chilled garlic herb butter log into four equal parts. Place one piece in the center of each chicken breast, fold the edges over the butter, and then roll tightly into a neat little log. Wrapping each roll in plastic wrap again and chilling for 30 minutes is the secret to making sure they hold their shape during cooking — no butter escapes!
Step 4: Bread the Chicken
Set up your breading station with three bowls: flour, beaten eggs, and seasoned breadcrumbs. Dip each chicken roll in flour, then egg, and finally coat it generously with breadcrumbs. This triple layer creates the lovely crunch and acts as a sturdy barrier that locks in juiciness when frying.
Step 5: Fry the Chicken
Heat vegetable oil in a skillet over medium-high heat and carefully add the breaded chicken rolls. Fry for 3 to 4 minutes on each side, turning gently to develop an even golden crust. Once perfectly browned, transfer the rolls to paper towels so they drain excess oil without losing their crispiness.
Step 6: Finish in the Oven (Optional)
For peace of mind, especially if your chicken breasts are quite thick, pop the fried rolls into a preheated 350°F (175°C) oven for 10 to 12 minutes. This extra oven time ensures the chicken is juicy and cooked through without drying out.
Step 7: Serve & Enjoy
Allow your Chicken Kiev to rest briefly so the butter inside settles, then slice carefully to marvel at that beautiful, buttery core. Serve hot alongside your favorite sides to savor every delicious morsel.
How to Serve Chicken Kiev Recipe
Garnishes
A sprinkle of fresh parsley or dill on top adds a burst of color and herbaceous flavor that complements the garlicky butter inside. A wedge of lemon on the side brightens the whole dish with a zesty kick.
Side Dishes
Chicken Kiev pairs beautifully with creamy mashed potatoes to soak up that melted butter, or steamed green vegetables like asparagus or broccoli for a fresh, vibrant contrast. A simple mixed green salad with a light vinaigrette also provides a refreshing balance.
Creative Ways to Present
For a fun twist, try serving mini Chicken Kiev rolls as appetizers, paired with a tangy dipping sauce. Alternatively, present sliced rolls atop a bed of wild rice pilaf or roasted vegetables for an elegant, restaurant-style plate.
Make Ahead and Storage
Storing Leftovers
Leftover Chicken Kiev can be safely stored in an airtight container in the refrigerator for up to 3 days. Keeping the crust crisp is tricky, so reheat gently to maintain the texture.
Freezing
You can freeze uncooked, breaded Chicken Kiev rolls by wrapping them tightly in plastic wrap and placing them in a freezer bag. Freeze for up to 2 months, then cook from frozen by adjusting frying and baking times slightly.
Reheating
To reheat, bake the leftovers in a 350°F (175°C) oven for about 15 minutes until heated through and the crust is crispy again. Avoid microwaving as it can make the crust soggy and the butter may leak out too quickly.
FAQs
Can I use chicken thighs instead of breasts?
While chicken breasts are best because they’re easier to flatten and roll, you can use boneless, skinless thighs if trimmed well. Just know that thighs are fattier and may require slightly different cooking times.
What if I don’t have fresh herbs?
If fresh parsley or dill aren’t available, dried herbs can be used sparingly, but fresh herbs really brighten the garlic butter and make this Chicken Kiev Recipe sing.
Is it necessary to fry the chicken, or can I bake it?
Frying gives the best crisp texture, but you can bake the breaded rolls at 400°F (200°C) for about 25-30 minutes until golden and cooked through for a lighter version.
How do I prevent the butter from leaking out?
Chilling the butter log and the stuffed chicken rolls thoroughly before breading and cooking is crucial. Also, make sure the edges of the chicken are tightly sealed to keep that flavorful butter safely inside.
Can I make this recipe dairy-free?
Traditional Chicken Kiev relies heavily on butter for its signature flavor and texture. For a dairy-free version, you might try a plant-based butter substitute, but the flavor profile will differ.
Final Thoughts
This Chicken Kiev Recipe is truly a delightful culinary adventure that brings an elegant dish right into your home kitchen with surprisingly little fuss. The combination of crispy golden crust, tender chicken, and that unforgettable herb garlic butter center is nothing short of magical. I wholeheartedly encourage you to give this recipe a try—it’s one of those meals that never fails to impress, comfort, and bring smiles around the table.
Print
Chicken Kiev Recipe
- Prep Time: 30 minutes
- Cook Time: 15 minutes (including pan-frying and optional baking)
- Total Time: 45 minutes
- Yield: 4 servings
- Category: Main Course
- Method: Frying
- Cuisine: European
Description
Classic Chicken Kiev features tender chicken breasts stuffed with a flavorful garlic herb butter, breaded to a crispy golden finish and pan-fried to perfection. This dish combines a rich, buttery center with a crunchy exterior, making it a comforting and impressive meal to serve for family dinners or special occasions.
Ingredients
Garlic Herb Butter
- ½ cup unsalted butter, softened
- 2 cloves garlic, minced
- 1 tablespoon fresh parsley, chopped
- 1 tablespoon fresh dill, chopped (optional)
- 1 tablespoon lemon juice
- ½ teaspoon salt
- ¼ teaspoon black pepper
Chicken
- 4 boneless, skinless chicken breasts
- 1 teaspoon salt
- ½ teaspoon black pepper
- 1 teaspoon paprika
Breading
- 1 cup all-purpose flour
- 2 large eggs, beaten
- 1 ½ cups breadcrumbs (panko or regular)
- ½ teaspoon salt
- ¼ teaspoon black pepper
For Frying
- 1 cup vegetable oil (or as needed)
Instructions
- Make the Garlic Herb Butter: In a bowl, combine the softened butter, minced garlic, parsley, dill (if using), lemon juice, salt, and black pepper. Mix well, shape the mixture into a log using plastic wrap, and refrigerate for 30 minutes until firm.
- Prepare the Chicken: Place each chicken breast between two sheets of plastic wrap and gently pound with a meat mallet until about ¼ inch thick. Season both sides with salt, black pepper, and paprika.
- Stuff the Chicken: Cut the chilled butter log into 4 equal pieces. Place one piece in the center of each flattened chicken breast. Fold the edges over the butter and roll tightly into a log, ensuring the butter is completely sealed inside. Wrap each roll in plastic wrap and refrigerate for 30 minutes to help them hold their shape.
- Bread the Chicken: Set up a breading station with three shallow bowls: one with flour, one with beaten eggs, and one with breadcrumbs mixed with salt and black pepper. Dip each chicken roll in the flour, then the egg, and finally coat it evenly in the breadcrumbs.
- Fry the Chicken: Heat the vegetable oil in a large skillet over medium-high heat. Carefully add the breaded chicken rolls and fry for 3–4 minutes per side until golden brown. Transfer the chicken to a paper towel-lined plate to drain any excess oil.
- Finish in the Oven (Optional): For extra assurance of doneness, transfer the fried chicken rolls to a baking dish and bake in a preheated 350°F (175°C) oven for an additional 10–12 minutes.
- Serve & Enjoy: Let the Chicken Kiev rest for 5 minutes before slicing. Serve hot with sides like mashed potatoes, steamed vegetables, or a fresh green salad.
Notes
- Ensure the butter is well chilled and the chicken is tightly sealed to prevent the butter from leaking during cooking.
- You can substitute fresh dill with fresh thyme if preferred or omit it entirely.
- To make the dish ahead, prepare and bread the chicken rolls, then refrigerate them; fry and bake just before serving.
- Use panko breadcrumbs for a lighter, crunchier coating.
- The optional oven finish helps ensure the chicken is fully cooked without burning the breadcrumbs.
