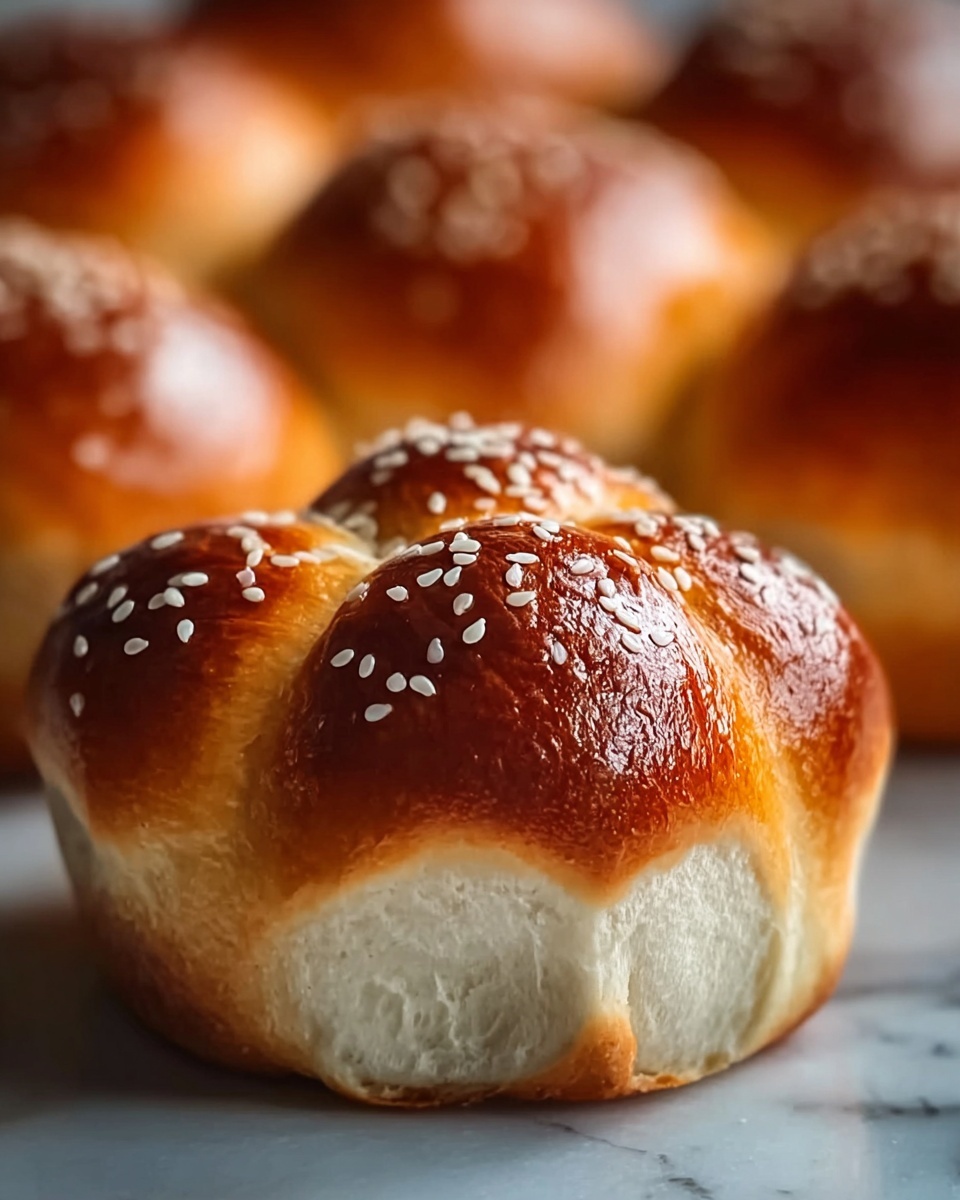
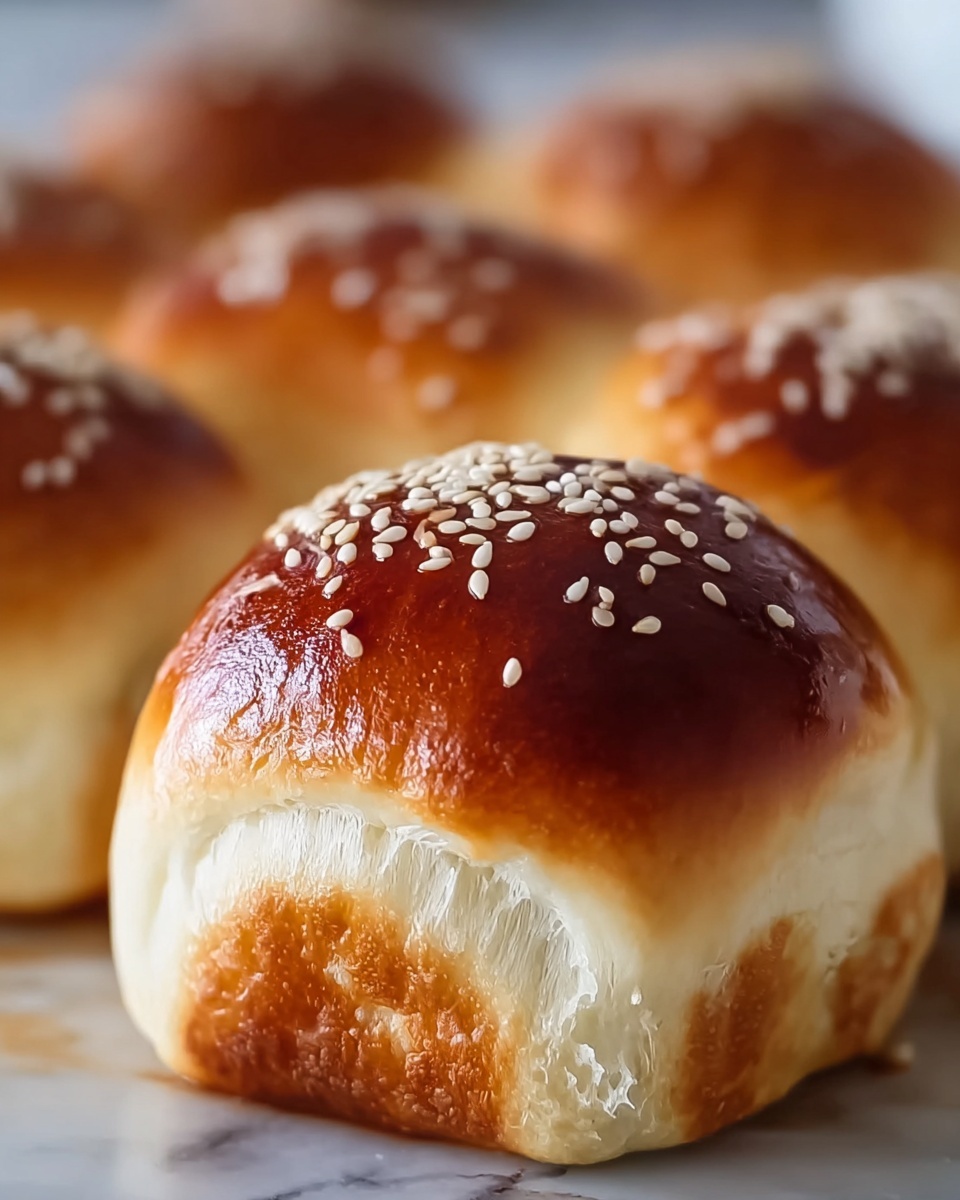
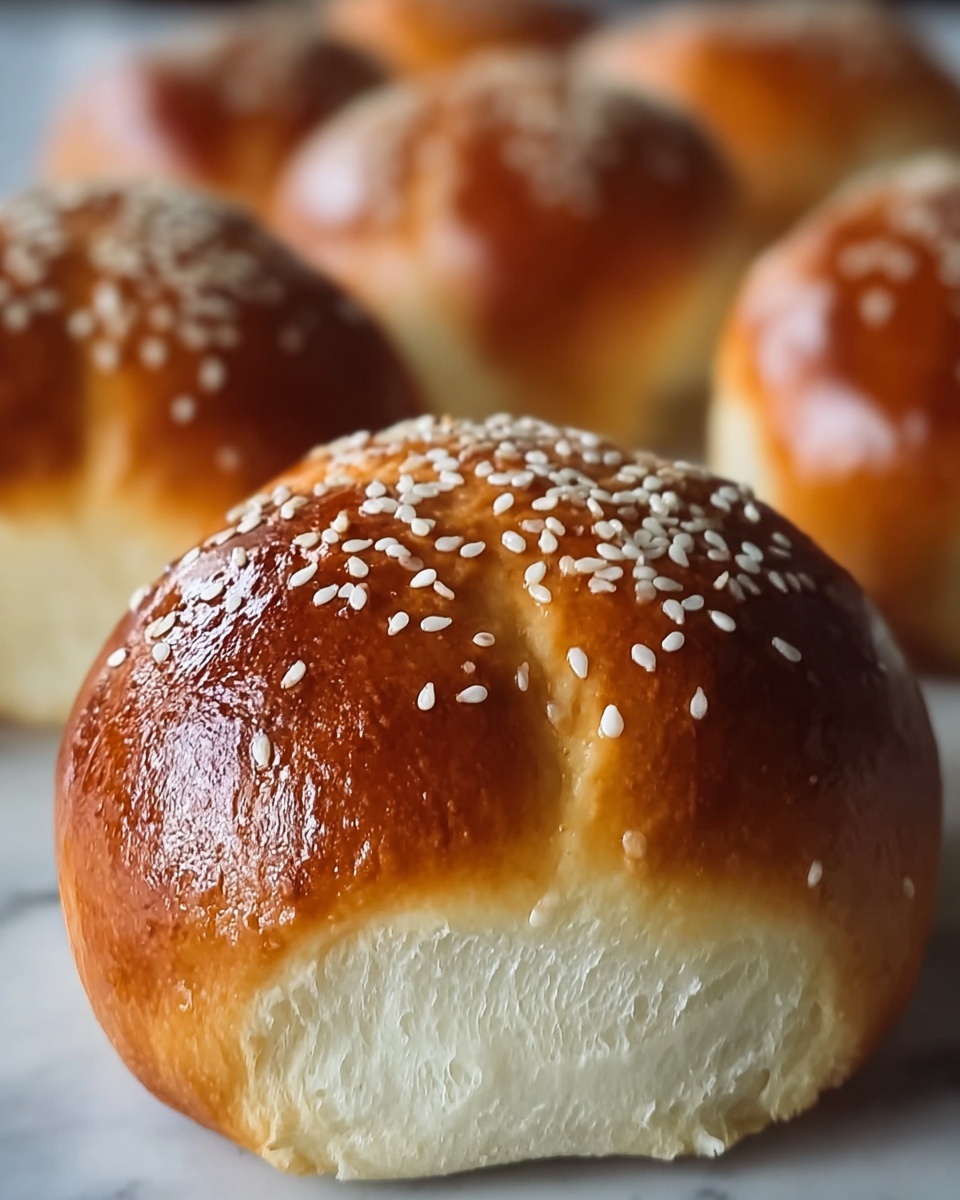
If you have a soft spot for sweet, fluffy treats that bring a smile to everyone’s face, this Bunny Buns Recipe is just the thing to add some joy to your kitchen. These adorable little buns, soft with a cinnamon-swirled filling, can brighten any breakfast, snack time, or festive occasion. With a tender dough that’s subtly flavored with vanilla and a gooey, cinnamon-sugar inside, Bunny Buns are both irresistibly cute and deliciously comforting, perfect for sharing or enjoying as a cozy bite by yourself.
Ingredients You’ll Need
It’s amazing how just a handful of simple ingredients come together to create these charming, flavorful Bunny Buns. Each plays a vital role in building the dough’s soft texture, rich flavor, and that beautiful golden finish you’ll love.
- Active dry yeast (2 1/4 tsp): This little powerhouse makes the dough rise and become light and airy.
- Warm milk (1/2 cup): Helps activate the yeast and adds gentle moisture for a tender crumb.
- Granulated sugar (1/4 cup): Adds sweetness and feeds the yeast to give the buns a nice rise.
- Unsalted butter, melted (1/2 cup): Infuses richness and tenderness throughout the dough.
- Salt (1/2 tsp): Balances sweetness and enhances flavor.
- Large eggs (2): Provide structure and a delicate richness.
- All-purpose flour (3 1/2 cups plus extra): The foundation of the dough, giving it its shape and texture.
- Vanilla extract (1 tsp): Adds warm, aromatic notes.
- Brown sugar (1/2 cup) for filling: Makes the filling caramel-like and perfectly sweet.
- Cinnamon (2 tsp) for filling: Adds that classic, comforting spice flavor.
- Unsalted butter, softened (1/4 cup) for filling: Helps the filling spread smoothly and adds richness.
- Chocolate chips (1/4 cup) optional: Add a luscious melty surprise inside each bun.
- Egg (1) for egg wash: Gives the buns a shiny, golden crust.
- Powdered sugar (1/4 cup) and milk (1 tbsp) for optional icing: Create a sweet drizzle that takes these buns over the top.
How to Make Bunny Buns Recipe
Step 1: Activate the Yeast
Begin by combining warm milk, sugar, and yeast in a small bowl. Give it a gentle stir and let it rest for 5 minutes until it becomes frothy. This signals the yeast is alive and ready to work its magic on your dough.
Step 2: Mix the Wet Ingredients and Combine with Yeast
In a larger bowl, whisk together melted butter, salt, and eggs until well blended. Pour in the yeast mixture and vanilla extract. Slowly incorporate the flour, adding one cup at a time, until a rough dough forms. This starts building structure without overworking the dough.
Step 3: Knead to Perfection
Turn the dough onto a floured surface and knead for 5 to 7 minutes. You want it smooth and elastic—this step develops gluten, giving the buns their signature tender but chewy bite. Then, place the dough in a greased bowl, cover with a towel, and let it rise until doubled in size, about 1 to 1.5 hours.
Step 4: Prepare the Baking Setup
While the dough rests, preheat your oven to 375°F (190°C). Grease your baking dish or line it with parchment paper to ensure your Bunny Buns bake perfectly without sticking.
Step 5: Roll Out the Dough
After the dough has risen, punch it down gently to release air bubbles. Roll it out on a floured surface into a large rectangle approximately 12 by 18 inches. This shape allows the filling to spread evenly.
Step 6: Add the Filling
Spread softened butter over the dough’s surface evenly. Sprinkle brown sugar and cinnamon mixture generously, adding chocolate chips if you want to take these buns to the next level. The filling is where all the cozy cinnamon-sugar goodness shines.
Step 7: Form the Log and Cut
Roll the dough tightly into a log shape from one long edge. Cut the log into twelve equal pieces, preparing them to become adorable bunny shapes.
Step 8: Shape the Bunny Buns
Take each piece and roll it into a ball. Then, with careful cuts, make two small slits at the top of each ball to create cute bunny ears. Pinch the sides gently to sculpt the body and head, giving each bun its charming bunny personality.
Step 9: Second Rise
Arrange the buns on your prepared baking dish with some space between them. Cover loosely with a clean towel and let them rise again for 30 to 45 minutes to puff up before baking.
Step 10: Apply the Egg Wash
Brush each bun with a beaten egg mixed with a splash of water. This creates a shiny, golden crust once baked, enhancing their irresistible appearance.
Step 11: Bake to Golden Perfection
Bake the buns in the preheated oven for 15 to 18 minutes. Keep an eye on them as they transform from doughy to beautifully golden with a tender crumb inside.
Step 12: Prepare the Optional Glaze
While baking, mix powdered sugar and milk to make a light glaze. This optional step adds an extra touch of sweetness and a pretty finish for serving.
Step 13: Cool and Glaze
Allow the buns to cool slightly on a wire rack before drizzling with glaze or enjoying plain. Either way, they’re pure bliss!
How to Serve Bunny Buns Recipe
Garnishes
For a charming presentation, dust the Bunny Buns lightly with powdered sugar or drizzle with the optional icing glaze. Fresh berries or a sprinkle of cinnamon can also add a pretty, flavorful touch that complements the sweet dough beautifully.
Side Dishes
Bunny Buns pair wonderfully with a cup of hot coffee, spiced chai tea, or a glass of cold milk. For a fuller breakfast or brunch, serve them alongside fresh fruit salad or creamy yogurt to balance the sweetness.
Creative Ways to Present
Try arranging the Bunny Buns on a rustic wooden board or pastel-colored plate for an inviting look. You can also place tiny edible flowers or sprigs of mint around the platter for a festive touch, especially wonderful for spring or holiday gatherings.
Make Ahead and Storage
Storing Leftovers
Once completely cooled, store your Bunny Buns in an airtight container at room temperature. They stay fresh and soft for 2 to 3 days, making them a great make-ahead treat to enjoy throughout the week.
Freezing
You can freeze the baked buns by wrapping them individually in plastic wrap and placing them in a freezer-safe bag. They’ll keep well for up to 2 months. Just thaw them overnight at room temperature before reheating.
Reheating
Reheat the buns gently in a microwave for about 15 seconds or in a warm oven at 300°F (150°C) for 5 to 7 minutes to bring back that fresh-baked softness. Adding a little butter on top before reheating can make them extra indulgent.
FAQs
Can I use instant yeast instead of active dry yeast?
Yes, instant yeast can be used by mixing it directly with the flour and skipping the proofing step. Adjust the amount to about 2 teaspoons for best results in the Bunny Buns Recipe.
What if I don’t want to use chocolate chips?
No problem at all! The cinnamon and brown sugar filling alone is deliciously sweet, but you can also try chopped nuts or dried fruit for a fun twist.
How do I keep the buns soft for longer?
Storing the buns in an airtight container and slightly warming them before serving helps maintain softness. Avoid refrigerating as it can dry them out.
Can I make this Bunny Buns Recipe vegan?
To make a vegan version, substitute the butter with a plant-based alternative, use flax eggs as an egg replacement, and opt for non-dairy milk. The texture might vary slightly but will still be delightful.
What’s the best way to shape the bunny ears?
Cut two small, vertical slits at the top of each dough ball and gently separate the slits to create the ears. Pinching the dough slightly at the sides gives the buns their bunny-like shape and character.
Final Thoughts
Making this Bunny Buns Recipe is such a joyful experience, from the soft dough to the sweet cinnamon swirl and those cute little bunny ears that bring a smile as soon as they come out of the oven. Whether you’re baking for family, friends, or just yourself, these buns are sure to become a beloved favorite that’s both fun to make and irresistible to eat. Give them a try—you won’t regret it!
Print
Bunny Buns Recipe
- Prep Time: 20 minutes
- Cook Time: 15-18 minutes
- Total Time: 1 hour 50 minutes
- Yield: 12 buns
- Category: Baking
- Method: Baking
- Cuisine: American
Description
These delightful Bunny Buns are soft, sweet yeast rolls rolled with cinnamon and brown sugar, optionally filled with chocolate chips, and shaped charmingly like bunnies. Perfect for a fun breakfast or festive snack, they feature a light vanilla-scented dough and a golden, shiny crust enhanced with an optional sweet glaze.
Ingredients
Dough Ingredients
- 1 package (2 1/4 tsp) active dry yeast
- 1/2 cup warm milk (about 110°F)
- 1/4 cup granulated sugar
- 1/2 cup unsalted butter (melted)
- 1/2 tsp salt
- 2 large eggs
- 3 1/2 cups all-purpose flour (plus extra for rolling)
- 1 tsp vanilla extract
Filling Ingredients
- 1/2 cup brown sugar
- 2 tsp cinnamon
- 1/4 cup unsalted butter (softened)
- 1/4 cup chocolate chips (optional)
Topping and Glaze Ingredients
- 1 egg (for egg wash)
- 1/4 cup powdered sugar (for icing, optional)
- 1 tbsp milk (for icing, optional)
Instructions
- Activate the yeast: In a small bowl, combine warm milk, granulated sugar, and active dry yeast. Stir to dissolve and let the mixture sit for about 5 minutes until frothy, indicating the yeast is active.
- Make the dough: In a large bowl, mix melted butter, salt, and eggs. Add the yeast mixture and vanilla extract. Gradually add the all-purpose flour, one cup at a time, mixing until a dough ball forms.
- Knead the dough: On a floured surface, knead the dough for 5 to 7 minutes until it becomes smooth and elastic. Place the dough in a lightly greased bowl, cover it with a clean cloth, and let it rise in a warm place for 1 to 1.5 hours or until doubled in size.
- Preheat the oven and prepare pan: Preheat the oven to 375°F (190°C). Grease a baking dish or line it with parchment paper to prevent sticking.
- Roll out the dough: Punch down the risen dough and roll it out into a large rectangle measuring roughly 12 by 18 inches on a lightly floured surface.
- Add the filling: Spread the softened butter evenly over the rectangle, then sprinkle the brown sugar and cinnamon mixture on top. If desired, scatter chocolate chips evenly over the filling.
- Form the log and cut: Roll the dough tightly into a log starting from one long edge. Using a sharp knife, cut the log into 12 equal pieces.
- Shape the bunny buns: Take each piece and roll it into a ball. On the top of each ball, cut two small slits to form bunny ears, then pinch the sides to shape the body and head, giving a charming bunny appearance.
- Second rise: Arrange the shaped buns on the prepared baking dish, leaving space between each. Cover with a clean towel and let them rise for 30 to 45 minutes until puffy.
- Apply egg wash: Beat the egg with a splash of water to make an egg wash and brush it gently over the buns to give them a beautiful golden finish when baked.
- Bake: Bake the buns in the preheated oven for 15 to 18 minutes, or until they turn golden brown and are cooked through.
- Prepare the glaze (optional): While the buns bake, mix powdered sugar with milk to create a smooth icing glaze.
- Cool and glaze: Let the buns cool slightly after baking, then drizzle the optional glaze over them or serve them plain.
Notes
- Ensure the milk is warm but not hot to avoid killing the yeast.
- You can omit the chocolate chips for a classic cinnamon bun experience.
- The buns can be stored in an airtight container at room temperature for 2 days or frozen for longer storage.
- Brush with egg wash right before baking to achieve a shiny golden crust.
- For a lower sweetness option, reduce the brown sugar in the filling.

