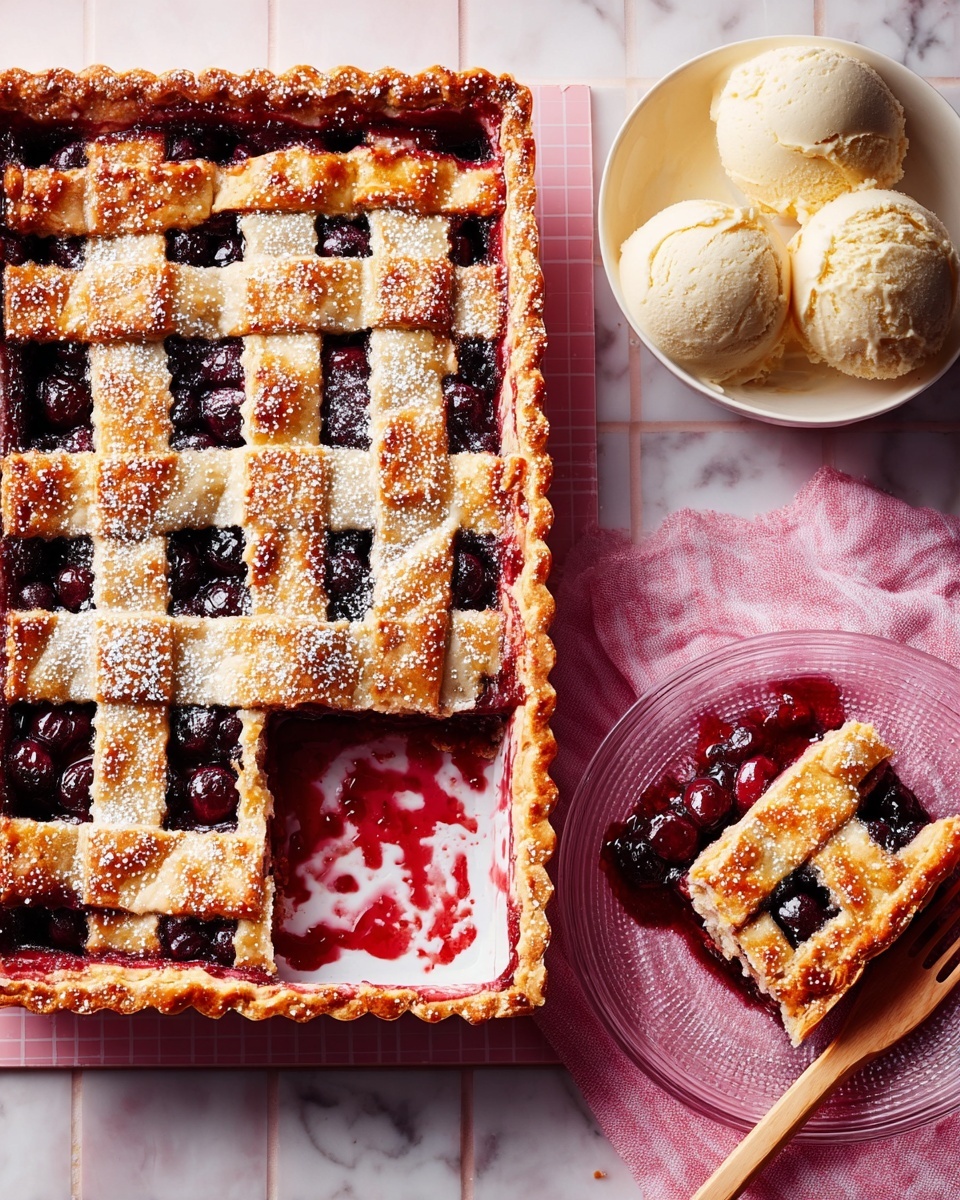
If you’re craving a dessert that bursts with juicy, tart cherries wrapped in flaky, buttery pastry, you’ve just found your new favorite treat. This Cherry & Soured Cream Slab Pie Recipe brings together the tangy brightness of soured cream and the vivid sweetness of cherries in one glorious, shareable slab that’s as stunning as it is scrumptious. Every bite delivers a perfect harmony of textures and flavors that feels like an elegant hug from your kitchen.
Ingredients You’ll Need
Simple ingredients come together to create a pie that’s both comforting and show-stopping. Each plays a vital role, whether building that flaky crust, offering a sweet-tart fruit filling, or adding a creamy dreamy swirl on top.
- All-purpose flour: 300g – This is the foundation, forming a sturdy yet tender pastry base.
- Unsalted butter: 150g, cold and cubed – Cold butter ensures a flaky texture that melts in your mouth.
- Icing sugar: 50g – Adds a subtle sweetness to the pastry dough without overpowering.
- Chilled water: 60–80ml – Pulls the dough together just right without making it tough.
- Egg yolk: 1 – Brushed on top for a golden, glossy crust that looks as good as it tastes.
- Cherries (pitted): 500g – The star players, bursting with sweet-tart flavor that defines this pie.
- Caster sugar (for cherries): 80g – Sweetens and balances the cherries’ natural tang.
- Cornstarch: 1 tbsp – Thickens the cherry juices so the filling doesn’t get soggy.
- Lemon juice: 1 tbsp – Brightens and intensifies the cherry flavor.
- Soured cream: 200g – Adds that luscious, tangy creaminess that sets this pie apart.
- Caster sugar (for swirl): 25g – Sweetens the sour cream mixture just enough to complement the fruit.
- Egg white: 1 – Lightens the cream swirl, giving it a delicate texture on top.
- Vanilla extract: ½ tsp – Warms and rounds out the flavors beautifully.
- Salt: Pinch – Enhances every ingredient, balancing sweetness and tartness.
How to Make Cherry & Soured Cream Slab Pie Recipe
Step 1: Prepare Your Oven and Pan
Start by heating your oven to 180°C (350°F) and lining a rectangular baking pan with parchment paper. This simple setup ensures your pie bakes evenly and lifts out easily once it’s baked to golden perfection.
Step 2: Make the Perfect Pastry Dough
Rub the cold, cubed butter into the flour and icing sugar until the mixture resembles coarse crumbs. Then, gradually add the chilled water until the dough just pulls together. This method creates that buttery, flaky texture we’re after. Press two-thirds of this dough evenly into your lined pan and pop it into the fridge to chill for 10 minutes—chilling helps the pastry hold its shape and bake crisp.
Step 3: Prepare the Cherry Filling
While the dough chills, toss your pitted cherries with caster sugar, cornstarch, and lemon juice. This combination sweetens the fruit while thickening the juices to keep the filling from being runny. Let this mixture rest so the flavors meld beautifully.
Step 4: Assemble the Cherry Layer
Spread the cherry mixture evenly over the chilled pastry base, making sure to distribute the fruit so every slice is packed with cherry goodness.
Step 5: Mix the Soured Cream Swirl
In a bowl, combine soured cream, sugar, egg white, vanilla extract, and a pinch of salt. Whisk until smooth and velvety—this creamy mixture is what gives the pie that irresistible tang and luscious texture on top of the cherries.
Step 6: Create the Signature Swirl
Dollop the soured cream mixture over the cherry layer, then gently swirl it with a knife or skewer to create a pretty marbled effect. This swirl not only looks beautiful but also reveals a sensational blend of flavors with every bite.
Step 7: Add the Final Pastry Topping
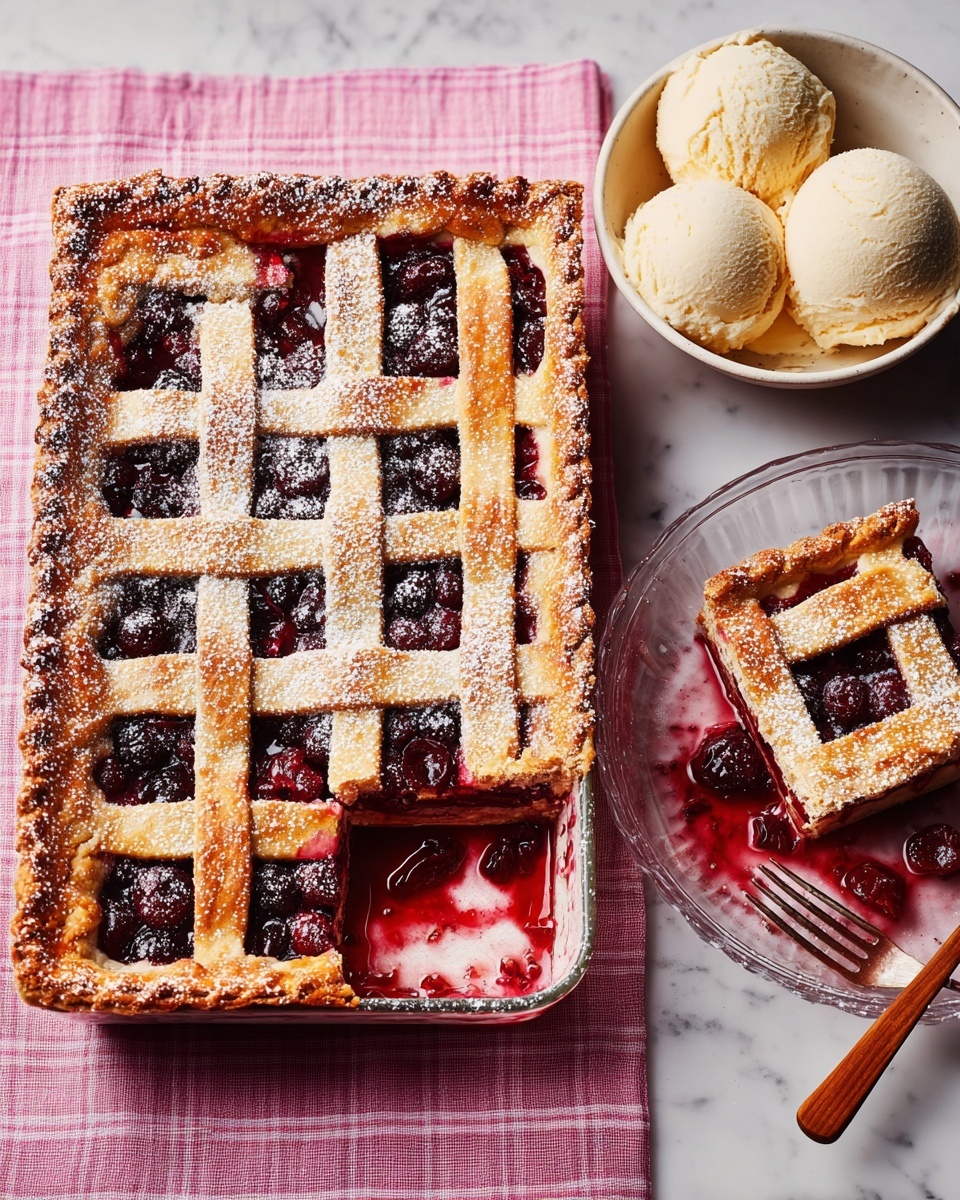
Take the remaining dough, crumble it or roll out and cut into strips to form a lattice, then scatter or layer these over your pie. This finishing touch adds even more flaky texture and a golden crust that’s simply irresistible.
Step 8: Bake Until Golden and Bubbling
Bake your pie for 35 to 40 minutes. You’re aiming for a bubbling cherry filling and a golden-brown top that smells unbelievably inviting. The kitchen will fill with the most wonderful smells—it’s practically impossible to resist!
Step 9: Cool and Slice
Once baked, let your slab pie cool completely in the pan. This resting time helps the filling set so every slice holds together beautifully when cut.
Step 10: Serve and Enjoy!
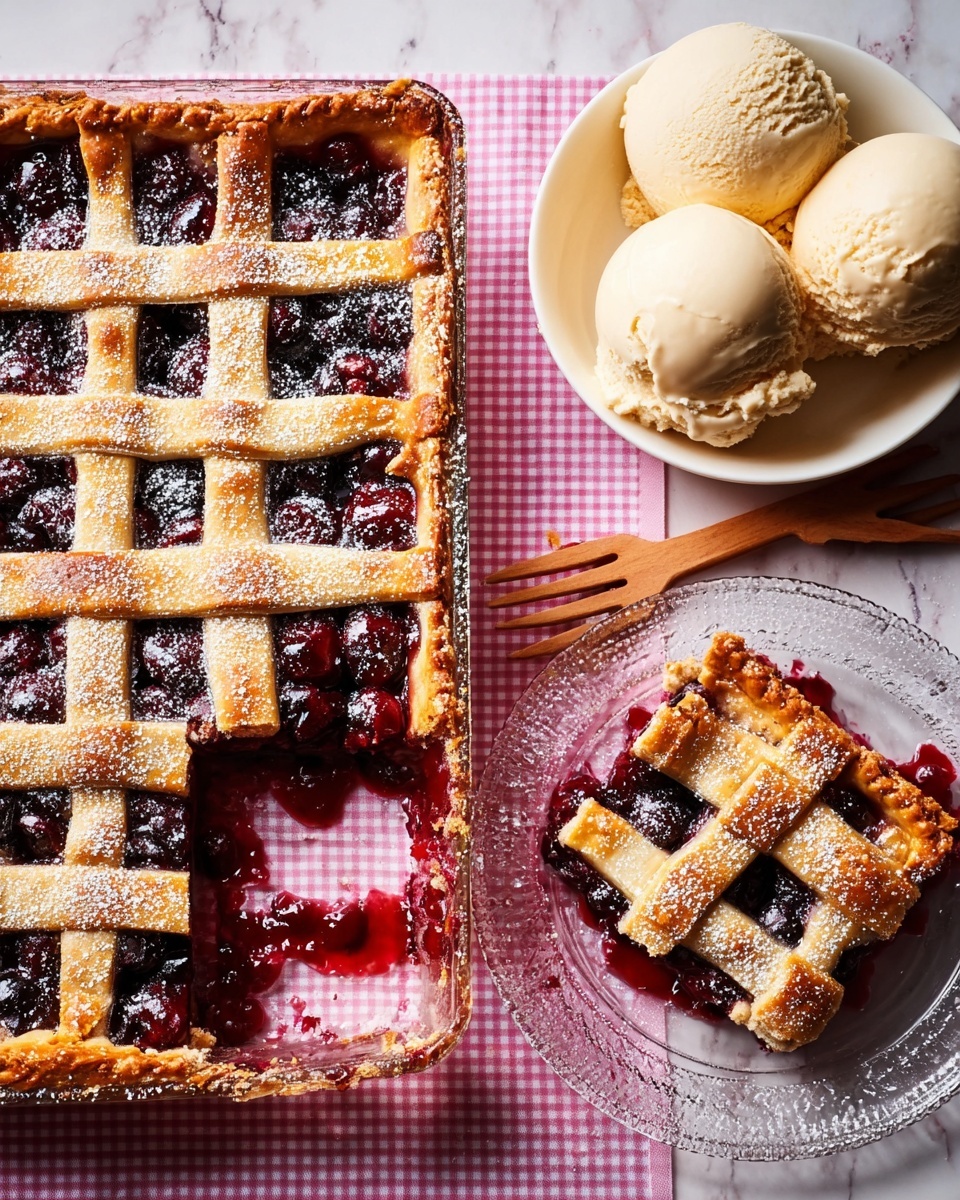
Lift the pie from the pan using the parchment paper and slice into rustic squares. Serve warm or at room temperature, ideally with a scoop of cream or ice cream to take the indulgence even further.
How to Serve Cherry & Soured Cream Slab Pie Recipe
Garnishes
Freshly picked mint leaves or a dusting of icing sugar adds a simple but elegant finishing touch to servings. Don’t forget the extra dollop of whipped cream or a scoop of vanilla ice cream for that dreamy indulgence.
Side Dishes
This slab pie shines on its own but pairs marvelously with a crisp green salad if you’re serving it as part of a larger meal. A light elderflower cordial also complements the fruity flavors beautifully if drinks are on your mind.
Creative Ways to Present
Try serving slices inside pretty dessert plates with a drizzle of cherry syrup or a sprinkle of toasted almonds for added crunch. For picnics or casual gatherings, cut into squares and stack on a wooden board for a rustic look that screams shareable joy.
Make Ahead and Storage
Storing Leftovers
Leftover Cherry & Soured Cream Slab Pie Recipe keeps wonderfully in the fridge, covered loosely with foil or plastic wrap. It will stay fresh for up to 3 days, making it a perfect treat to enjoy again or share with friends.
Freezing
This pie also freezes well! Wrap it tightly in plastic wrap and then in foil, or store in an airtight container before popping it into the freezer. It can be frozen for up to a month and defrosted overnight in the fridge when you’re ready to enjoy it again.
Reheating
To bring leftovers back to life, heat slices in a warm oven at 160°C (320°F) for about 10 minutes. This warms the filling and refreshes the flaky pastry without drying it out—almost like freshly baked all over again.
FAQs
Can I use frozen cherries for this pie?
Absolutely! Frozen cherries work great, just be sure to thaw and drain any excess liquid before tossing them with sugar and cornstarch to prevent a runny filling.
Is soured cream essential or can I substitute it?
Soured cream is key for that signature tang and creaminess in the swirl, but if you must substitute, Greek yogurt or crème fraîche can be used for a similar effect.
How do I make the pastry extra flaky?
Using cold butter and cold water, and handling the dough gently helps keep the pastry flaky. Don’t overwork it, and chilling the dough before baking is essential for crumbly layers.
Can this pie be made gluten-free?
With a gluten-free flour blend suitable for pastry, you can definitely adapt this recipe. Keep an eye on the dough’s consistency as gluten-free flours can behave differently.
What’s the best way to prevent the pie from becoming soggy?
Using cornstarch in the filling thickens the cherry juices, and chilling the pastry base before layering helps protect it from soaking up too much liquid during baking.
Final Thoughts
There’s something truly magical about the Cherry & Soured Cream Slab Pie Recipe that makes it a must-try for anyone who loves vibrant, comforting desserts. Its balance of tart cherries, lush soured cream, and flaky pastry creates a sense of home and celebration all at once. I can’t wait for you to make this pie, share it with your loved ones, and create those warm, memorable moments in your kitchen.
Print
Cherry & Soured Cream Slab Pie Recipe
- Prep Time: 20 minutes
- Cook Time: 40 minutes
- Total Time: 1 hour
- Yield: 8 servings
- Category: Baking
- Method: Baking
- Cuisine: British
Description
This Cherry & Soured Cream Slab Pie features a buttery, flaky pastry base loaded with a sweet-tart cherry filling, topped with a creamy, tangy soured cream swirl and a crumbly or lattice dough topping. Baked to golden perfection, it’s a delightful dessert perfect for warm-weather gatherings or cozy family treats.
Ingredients
Pastry Dough
- 300g all-purpose flour
- 150g unsalted butter, cold and cubed
- 50g icing sugar
- 60–80ml chilled water
- 1 egg yolk (for egg wash)
- Pinch of salt
Cherry Filling
- 500g pitted cherries
- 80g caster sugar
- 1 tbsp cornstarch
- 1 tbsp lemon juice
Soured Cream Swirl
- 200g soured cream
- 25g caster sugar
- 1 egg white
- ½ tsp vanilla extract
- Pinch of salt
Instructions
- Preheat and prepare pan: Preheat your oven to 180°C (350°F). Line a rectangular baking pan with parchment paper to prevent sticking and ensure easy removal.
- Make the pastry dough: Rub the cold cubed butter into the flour and icing sugar mixture until it resembles coarse crumbs. Gradually add chilled water until the dough just comes together. Press two-thirds of the dough evenly into the lined pan to form the base, then chill it in the fridge for 10 minutes to firm up.
- Prepare the cherry filling: Toss the pitted cherries with caster sugar, cornstarch, and lemon juice to combine. Let this mixture rest, allowing the sugar to draw out the juices and the cornstarch to start thickening.
- Assemble cherry layer: Evenly spread the cherry mixture over the chilled pastry base in the pan, creating a generous fruit layer.
- Make the soured cream swirl: In a bowl, whisk together soured cream, caster sugar, egg white, vanilla extract, and a pinch of salt until the mixture is smooth and slightly aerated.
- Add the cream topping: Dollop spoonfuls of the soured cream mixture across the cherry layer. Using a knife, gently swirl the cream topping into the cherries to create a marbled effect without fully blending the layers.
- Top with remaining dough: Take the remaining dough, crumble it or roll it out, and scatter or create a lattice pattern over the cream and cherry layers for a textured, golden crust.
- Bake the pie: Place the assembled pie in the preheated oven and bake for 35 to 40 minutes, or until the pastry is golden brown and the cherry filling is bubbling around the edges.
- Cool the pie: Remove the pie from the oven and allow it to cool completely in the pan to set the filling and make slicing easier.
- Serve and enjoy: Carefully lift the pie out using the parchment paper edges, slice into portions, and serve. Optionally, add extra cream or ice cream for an indulgent finish.
Notes
- Ensure the butter is very cold when rubbing into the flour to create a flaky pastry texture.
- The resting time for the cherry filling helps thicken the juices and enhances flavor.
- Swirling the soured cream gently prevents it from completely mixing with the cherries, preserving the visual marbled effect.
- Using parchment paper makes removal and cleanup easier.
- For a crisper crust, brush the lattice or crumb topping with the egg yolk before baking for a golden shine.
- Store leftovers covered in the refrigerator and consume within 2-3 days for best taste.


