
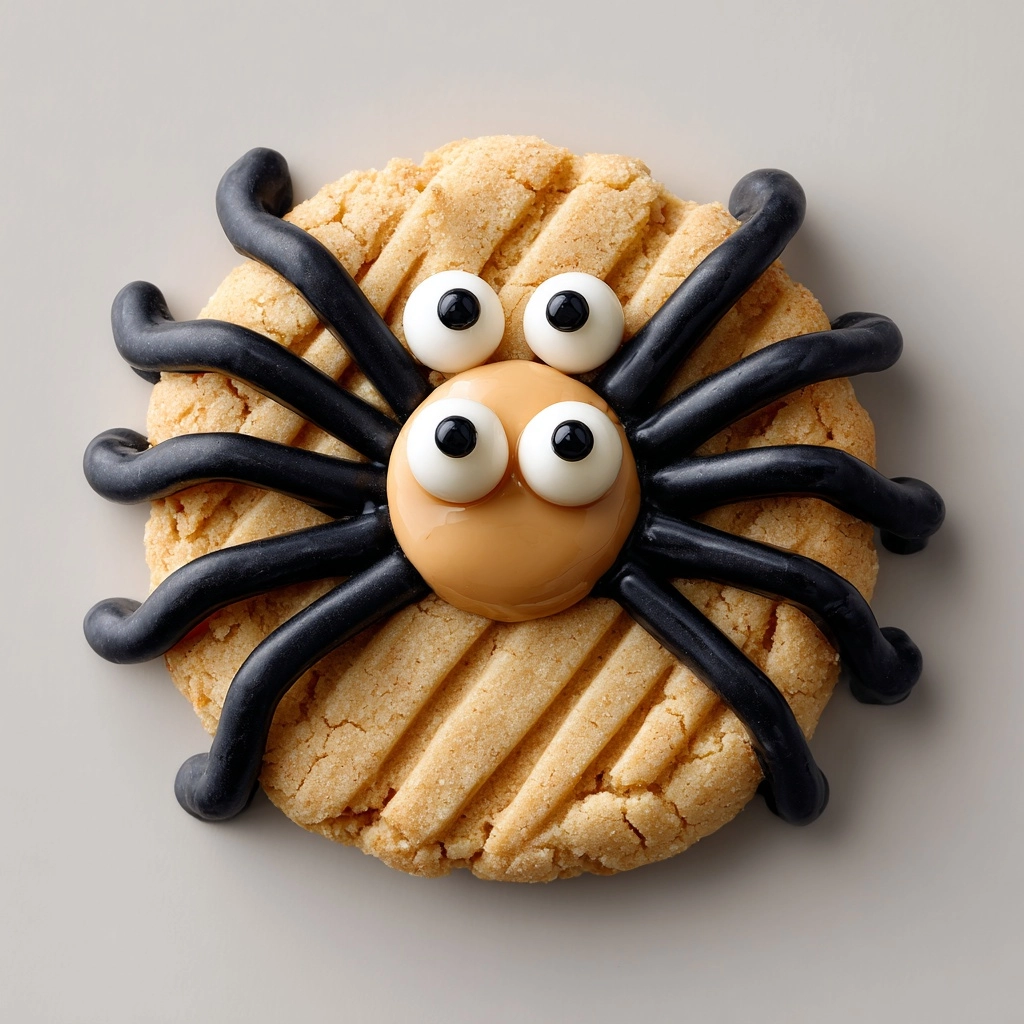
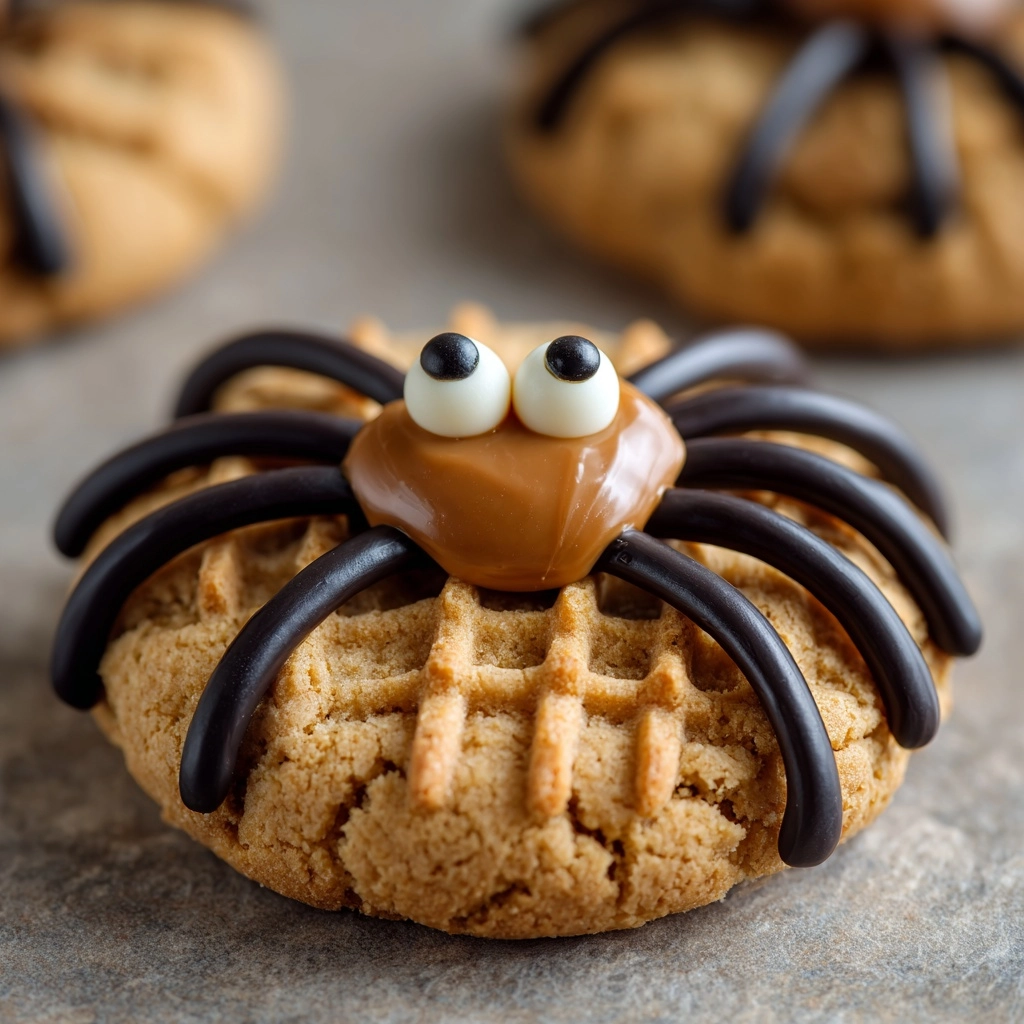
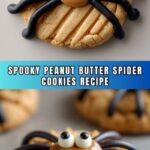
If you’re searching for a fun, festive, and utterly delicious treat to wow your friends and family, look no further than this Peanut Butter Spider Cookies Recipe. These adorable, spooky cookies combine rich peanut butter flavor, the gooey magic of mini peanut butter cups, and playful spider legs piped from melted chocolate, all crowned with candy eyeballs. Perfect for Halloween (or any time you want to channel your inner kid), these cookies are as delightful to make as they are to eat, offering a perfect balance of sweet, salty, and crunchy textures in every bite.
Ingredients You’ll Need
This Peanut Butter Spider Cookies Recipe calls for simple pantry staples that come together to create a cookie bursting with flavor and texture. Each ingredient plays a real role—from the creamy peanut butter that delivers richness, to the brown sugar which adds moisture and a subtle caramel note, to the fun decorations that bring these spiders to life!
- Unsalted butter (1/2 cup): Softened butter makes the cookies tender and adds buttery richness.
- Creamy peanut butter (1/2 cup): The star of the show, it gives these cookies their unmistakable peanut butter flavor.
- Granulated sugar (1/2 cup): Adds sweetness and a slight crisp to the cookie edges.
- Brown sugar (1/2 cup, packed): Locks in moisture and lends a subtle caramel depth.
- Large egg (1): Binds ingredients together and contributes to a soft texture.
- Vanilla extract (1 tsp): Enhances all the flavors with a warm, inviting fragrance.
- All-purpose flour (1 1/2 cups): The base that provides structure to the cookies.
- Baking soda (1/2 tsp): Helps the cookies rise and stay soft.
- Salt (1/4 tsp): Balances sweetness and amplifies peanut butter flavor.
- Mini peanut butter cups (24, unwrapped and chilled): Melt-resistant peanut butter centers that create the spider body.
- Semisweet chocolate chips (1/2 cup): Melted into piping chocolate to draw the spider legs.
- Candy eyeballs (48): The spooky final touch that makes each spider truly come alive.
How to Make Peanut Butter Spider Cookies Recipe
Step 1: Prepare Your Oven and Baking Sheet
Preheat your oven to 350°F (175°C), ensuring it reaches the ideal temperature for baking these delightful spider cookies. Line a baking sheet with parchment paper to prevent sticking and make cleanup a breeze.
Step 2: Cream the Butter, Peanut Butter, and Sugars
In a large mixing bowl, beat together the softened butter, creamy peanut butter, granulated sugar, and brown sugar until the mixture is light, fluffy, and perfectly combined. This step is crucial because it creates that tender, slightly chewy texture we love in peanut butter cookies.
Step 3: Add the Egg and Vanilla
Beat in the egg and the vanilla extract until they are fully incorporated. This helps to emulsify the dough and enhance the flavor profile, giving these cookies a subtly sweet aroma.
Step 4: Combine Dry Ingredients and Form Dough
In a separate bowl, whisk together the flour, baking soda, and salt. Gradually mix these dry ingredients into the wet mixture, stirring just until a soft dough forms. Be careful not to overmix, as you want your cookies to remain soft and tender.
Step 5: Shape the Cookies and Bake
Roll the dough into 1-inch balls and place them on your prepared baking sheet, spacing them about 2 inches apart to allow room for spreading. Bake for 10 to 12 minutes, or until the edges are just starting to turn a light golden color. This timing ensures the cookies stay soft while developing a slight crust on the outside.
Step 6: Add the Peanut Butter Cups
Remove the cookies from the oven and immediately press a chilled mini peanut butter cup into the center of each cookie. Chilling the cups beforehand prevents them from melting into a puddle and helps maintain the spider’s distinctive body shape.
Step 7: Cool and Decorate Your Spiders
Allow the cookies to cool on the baking sheet for about 5 minutes before transferring them to a wire rack to cool completely. While cooling, melt the semisweet chocolate chips and carefully transfer the melted chocolate to a piping bag or a zip-top bag with a small corner cut off. Pipe three little legs on each side of the peanut butter cup. Finally, use a dab of melted chocolate to attach two candy eyeballs on each spider’s body, giving them their spooky, fun personality.
How to Serve Peanut Butter Spider Cookies Recipe
Garnishes
If you want to take these cookies to the next level, sprinkle a little flaky sea salt on top before baking to enhance the peanut butter’s depth, or dust them lightly with cocoa powder for a more chocolate-forward twist. Edible glitter or colored sugar sprinkles can add an extra festive feel perfect for parties.
Side Dishes
Peanut Butter Spider Cookies are fantastic alongside a cold glass of milk or a warm mug of hot cocoa. For a festive Halloween treat table, serve them with bowls of candy corn or pumpkin-shaped sugar cookies to keep the spooky theme alive.
Creative Ways to Present
Use a decorative Halloween-themed plate or cookie tin to showcase your spider cookies. Arrange them in a circle to mimic a spider web or cluster them on a tiered dessert stand for an eye-catching display that guests will adore. Adding fake spider webs (the decorative kind) around the platter can really amp up the fun, spooky vibe.
Make Ahead and Storage
Storing Leftovers
After you’ve enjoyed your peanut butter spider cookies, store any leftovers in an airtight container at room temperature. They keep beautifully fresh for up to 5 days, allowing the flavors to meld and the textures to remain soft and chewy.
Freezing
If you want to make these cookies ahead of time, you can freeze the dough balls before baking. Place them on a baking sheet until firm, then transfer to a freezer-safe bag, separating layers with parchment paper. When you’re ready, bake from frozen, adding a couple of extra minutes to the baking time.
Reheating
A quick 10 to 15-second zap in the microwave will refresh the cookies, bringing back their soft, melty peanut butter and warm chocolate goodness. Just be sure not to overheat or the candy eyeballs might start to melt.
FAQs
Can I use crunchy peanut butter instead of creamy?
Absolutely! Using crunchy peanut butter will add an extra bit of texture to your cookies, giving each bite a delightful crunch alongside the soft dough and melty peanut butter cups.
What if I don’t have candy eyeballs?
If candy eyeballs aren’t available, you can substitute with small chocolate chips, raisins, or even draw eyes with white and dark icing. Get creative to keep those spiders looking spooky and fun!
Can these cookies be made gluten-free?
Yes, simply replace the all-purpose flour with a gluten-free baking blend that measures cup-for-cup equally. Just check that the blend contains xanthan gum to keep the cookies tender and soft.
Why should the peanut butter cups be chilled before pressing?
Chilling the peanut butter cups prevents them from melting into the warm cookie dough during baking, which helps maintain the spider’s shape and keeps the centers nice and firm.
How long do these cookies last?
Stored properly in an airtight container at room temperature, the cookies stay fresh for about 5 days. Beyond that, they may start to dry out or lose their soft texture.
Final Thoughts
There’s truly nothing like the joy that comes from biting into a freshly baked batch of these Peanut Butter Spider Cookies Recipe creations. They’re festive, wonderfully tasty, and guaranteed to bring smiles to both kids and adults alike. Whether you’re baking for Halloween, a themed party, or just because, these charming little treats are sure to become a beloved go-to. So roll up your sleeves, preheat that oven, and let the peanut butter spider fun begin!
Print
Peanut Butter Spider Cookies Recipe
- Prep Time: 20 minutes
- Cook Time: 12 minutes
- Total Time: 45 minutes
- Yield: 24 cookies
- Category: Dessert
- Method: Baking
- Cuisine: American
- Diet: Vegetarian
Description
These Peanut Butter Spider Cookies are a fun and festive Halloween treat featuring soft peanut butter cookies topped with mini peanut butter cups, decorated with melted chocolate legs and candy eyes to look like spiders. Perfect for spooky parties or a kid-friendly dessert, these cookies combine creamy peanut butter flavor and a playful presentation.
Ingredients
Cookie Dough
- 1/2 cup unsalted butter, softened
- 1/2 cup creamy peanut butter
- 1/2 cup granulated sugar
- 1/2 cup brown sugar, packed
- 1 large egg
- 1 tsp vanilla extract
- 1 1/2 cups all-purpose flour
- 1/2 tsp baking soda
- 1/4 tsp salt
Topping
- 24 mini peanut butter cups (unwrapped and chilled)
- 1/2 cup semisweet chocolate chips (for spider legs)
- 48 candy eyeballs
Instructions
- Preheat Oven: Preheat your oven to 350°F (175°C) and line a baking sheet with parchment paper to prepare for baking the cookies.
- Cream Butter and Sugars: In a large mixing bowl, cream together the softened butter, creamy peanut butter, granulated sugar, and brown sugar until the mixture becomes light and fluffy. This ensures a tender cookie texture.
- Add Egg and Vanilla: Beat in the egg and vanilla extract until fully combined, which will help bind the dough together and add flavor.
- Mix Dry Ingredients: In a separate bowl, whisk together the all-purpose flour, baking soda, and salt to evenly distribute the leavening agent and salt.
- Combine Wet and Dry: Gradually add the dry ingredients into the wet mixture, mixing until a soft dough forms that is ready to shape.
- Shape Cookies: Roll the dough into 1-inch balls and place them on the prepared baking sheet, spacing them about 2 inches apart to allow spreading while baking.
- Bake Cookies: Bake in the preheated oven for 10 to 12 minutes, or until the cookie edges turn lightly golden, indicating they are done.
- Add Peanut Butter Cups: Remove the cookies from the oven and immediately press one chilled mini peanut butter cup into the center of each warm cookie to create the spider body.
- Cool Cookies: Let the cookies cool on the baking sheet for 5 minutes, then transfer them to a wire rack to cool completely before decorating.
- Melt Chocolate: Melt the semisweet chocolate chips until smooth and transfer to a piping bag or a zip-top bag with a small corner cut off for precision.
- Decorate Spiders: Pipe three small chocolate legs on each side of the peanut butter cup on every cookie to mimic spider legs, then use melted chocolate as glue to attach two candy eyeballs on top of each peanut butter cup.
Notes
- Chilling the mini peanut butter cups before pressing them into the warm cookies prevents them from melting.
- Store the finished cookies in an airtight container at room temperature for up to 5 days to maintain freshness.
- This recipe is ideal for Halloween parties and themed gatherings, offering a fun and spooky dessert option.


