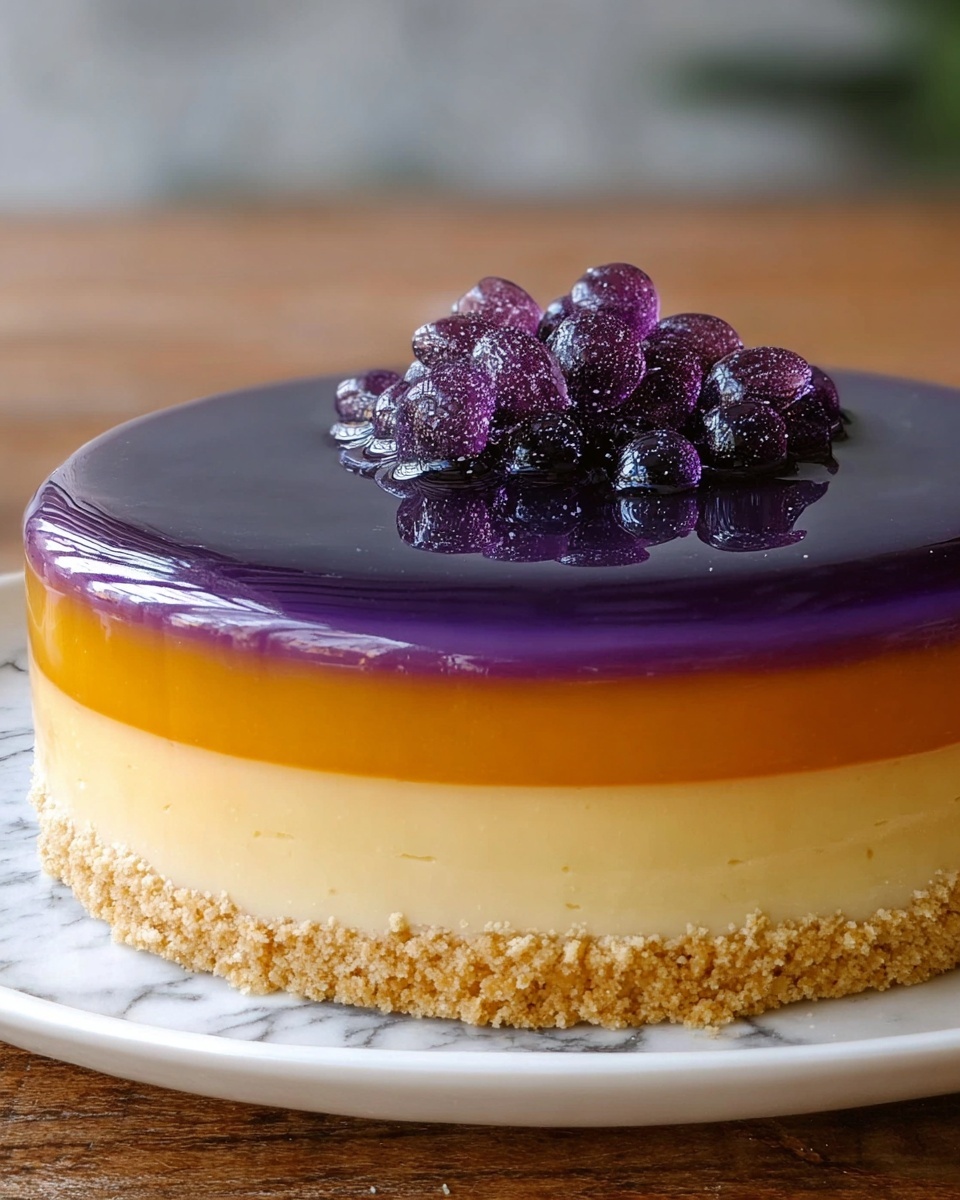
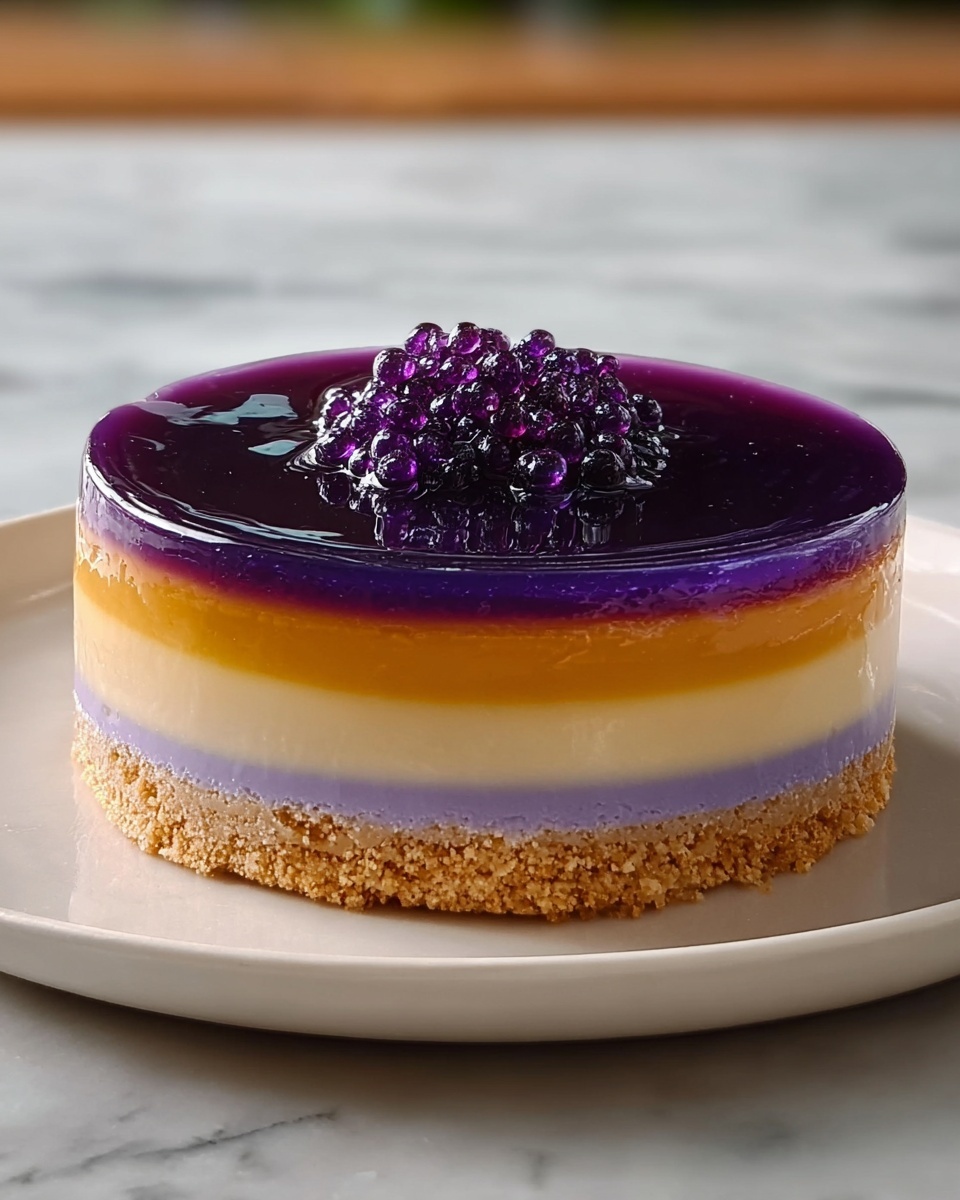
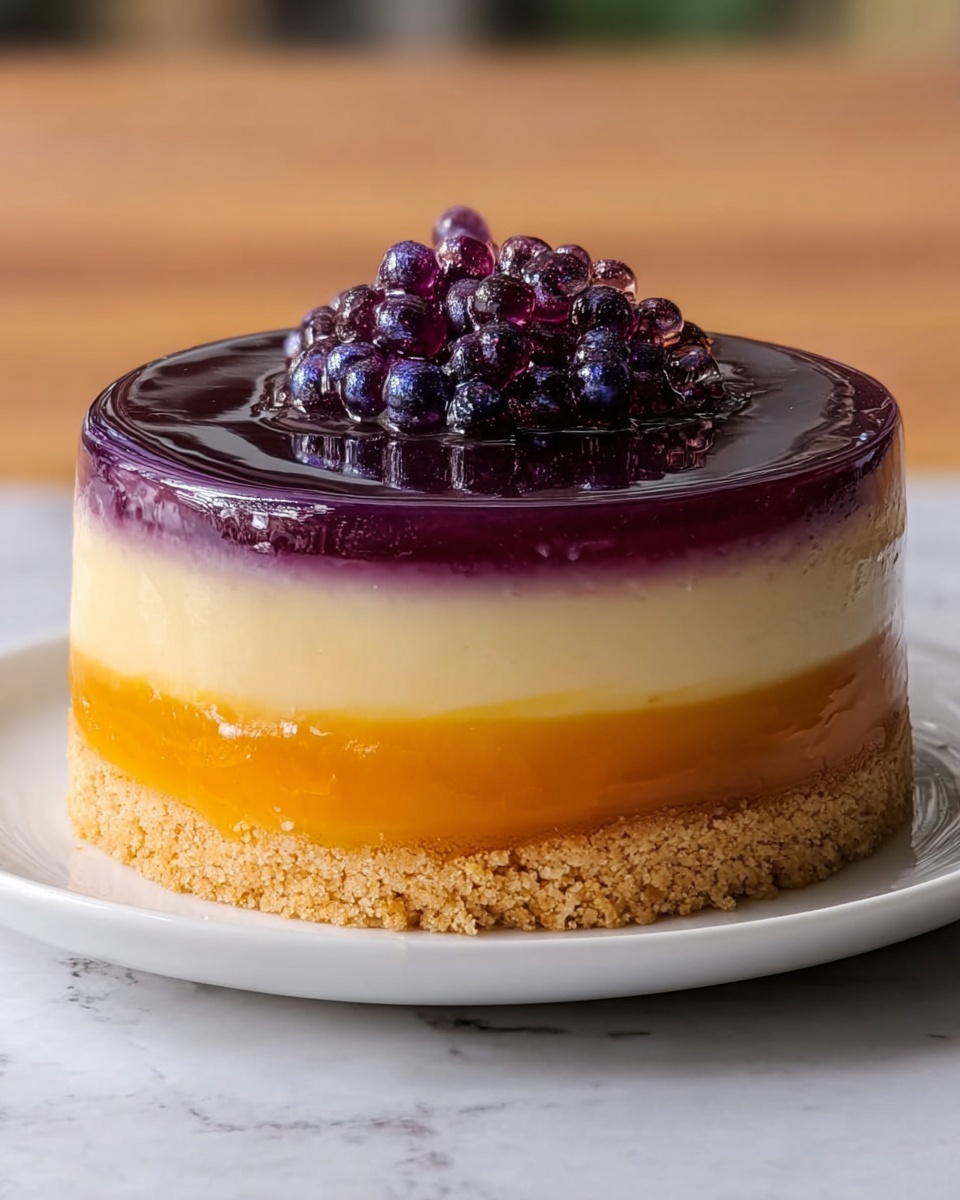
If you have a sweet spot for Filipino desserts that are both stunning and utterly delightful, you are going to fall head over heels for this Ube Leche Flan Cake Recipe. It brings together the rich, creamy decadence of leche flan with the vibrant, subtly sweet goodness of ube cake, creating a gorgeous layered treat that’s perfect for celebrations or whenever you want a special indulgence. Each bite offers a harmonious mix of velvety caramel, smooth custard, and moist purple yam-infused cake that feels like a warm hug for your taste buds.
Ingredients You’ll Need
Getting ready to make this Ube Leche Flan Cake Recipe is incredibly rewarding because the ingredients are straightforward yet essential. Each component plays a crucial role, from creating the luscious caramel coating to building the soft and flavorful ube cake layers.
- Sweetened condensed milk: This delivers the necessary sweetness and creamy texture to the leche flan layer.
- Evaporated milk: Adds richness without making the flan too heavy.
- Large egg yolks: The key to the smooth and silky texture of the leche flan.
- Vanilla extract: Brings warm, aromatic notes to both the flan and the cake.
- Granulated sugar (for caramel): The magic ingredient to create that signature golden caramel base.
- All-purpose flour: Forms the structure of the ube cake ensuring a soft crumb.
- Baking powder: Helps the cake rise perfectly.
- Salt: Balances the sweetness and enhances overall flavor.
- Unsalted butter, softened: Adds moisture and tender richness to the cake.
- Granulated sugar: Sweetens the cake batter for a delightful balance.
- Large eggs: Provide structure and richness to the cake batter.
- Ube halaya (mashed purple yam): The star ingredient giving the cake its beautiful color and earthy sweetness.
- Whole milk: Keeps the cake tender and moist.
- Ube extract or ube powder: Enhances the purple color and intensifies the ube flavor.
How to Make Ube Leche Flan Cake Recipe
Step 1: Prepare the Caramel for Leche Flan
Start by melting the granulated sugar slowly over medium heat, stirring constantly to prevent burning. Watch as the sugar transforms into that irresistible golden caramel that’s the foundation of the leche flan layer. Pour it straight into the bottom of your cake pan and swirl it to coat evenly; this ensures every slice has that sweet, slightly bitter caramel bite.
Step 2: Make the Leche Flan Mixture
Whisk together the sweetened condensed milk, evaporated milk, egg yolks, and vanilla extract until smooth and well combined. This mixture will become a silky custard that sits just beneath the ube cake, creating a delicious contrast in texture and flavor.
Step 3: Pour Leche Flan Over Caramel
Carefully pour the leche flan mixture over the cooled caramel layer in the cake pan. Be gentle to maintain the caramel’s even coating. Set this aside while you move on to the cake batter.
Step 4: Preheat the Oven and Prepare Dry Ingredients
Preheat your oven to 350°F (175°C). In a separate bowl, whisk together the flour, baking powder, and salt. This dry mix will ensure your cake rises nicely and has an even crumb.
Step 5: Cream Butter and Sugar
Using a stand mixer or hand mixer, beat the softened butter and sugar until the mixture is light and fluffy. This step is key to getting that tender texture in your ube cake.
Step 6: Add Eggs and Flavorings
Incorporate the eggs one at a time, making sure each is fully mixed in before adding the next. Then fold in the vanilla extract, ube halaya, and ube extract to infuse your batter with beautiful color and flavor.
Step 7: Combine Dry and Wet Ingredients
Alternate adding the dry flour mixture and whole milk to the wet batter, starting and ending with the flour blend. Mix gently but thoroughly until you achieve a smooth, luscious batter ready to be layered.
Step 8: Assemble the Cake
Pour the ube cake batter on top of the leche flan mixture in your cake pan, spreading evenly with a spatula. This layering creates the dynamic dual texture and flavor of the whole dessert.
Step 9: Bake with a Water Bath
Place your cake pan inside a larger roasting pan, then carefully pour hot water into the outer pan until it reaches halfway up the sides of the cake pan. This water bath ensures gentle, even cooking which is crucial for the perfect flan texture without cracking.
Step 10: Bake and Cool
Bake for about 50-60 minutes or until a toothpick comes out clean and the flan is set. Let the cake cool for 10 minutes before moving on to chilling.
Step 11: Chill and Unmold
Refrigerate the cake for at least 3 hours or overnight to let everything set properly. When ready, run a knife around the edges to loosen, place a plate on top, and flip the pan to reveal your masterpiece. The caramel will drizzle beautifully over the cake.
Step 12: Serve and Enjoy
Slice your chilled ube leche flan cake and savor the creamy layers bursting with flavor and color. It’s a dessert that tastes as spectacular as it looks.
How to Serve Ube Leche Flan Cake Recipe
Garnishes
To elevate your Ube Leche Flan Cake Recipe, consider garnishing with toasted coconut flakes for a subtle crunch or a sprinkle of edible gold dust to make it party-ready. Fresh berries or a dollop of whipped cream also pair beautifully, adding a hint of brightness to balance the cake’s creaminess.
Side Dishes
This cake shines best on its own or accompanied by a light fruit salad — think citrus segments or mango slices to add a refreshing contrast. A cup of hot tea or coffee complements the rich flavors perfectly, making every bite even more satisfying.
Creative Ways to Present
Presentation matters, especially with this Instagram-worthy dessert. Serve individual slices with a drizzle of coconut syrup or ube sauce for a dramatic touch. Alternatively, try layering mini servings in clear glass cups to highlight the distinct layers, making it an elegant option for parties.
Make Ahead and Storage
Storing Leftovers
Keep any leftover Ube Leche Flan Cake wrapped tightly in plastic wrap or stored in an airtight container in the refrigerator. It will stay fresh for up to 4 days, maintaining its creamy texture and vibrant flavor.
Freezing
If you want to save some for later, you can freeze the cake. Wrap it well in plastic wrap and aluminum foil to prevent freezer burn. It’s best enjoyed within 1 month of freezing. Thaw in the refrigerator overnight before serving.
Reheating
This cake is designed to be enjoyed chilled, so reheating isn’t recommended. Just let frozen pieces thaw completely in the fridge, and they’ll taste just as delightful as freshly made.
FAQs
Can I use ube powder instead of ube extract?
Absolutely! Ube powder is a great alternative if you don’t have ube extract. Just mix it with a little milk to create a smooth paste before adding it to your batter, ensuring vibrant color and authentic flavor.
Do I need a water bath for baking?
Yes, the water bath is essential for this Ube Leche Flan Cake Recipe because it creates a moist, even heat environment. This prevents the leche flan from cracking and helps the custard cook gently alongside the cake.
What’s the best way to serve this cake?
The cake should be served chilled. Serve slices straight from the fridge to enjoy the cool, smooth leche flan layer paired with the soft ube cake. Adding simple garnishes like toasted coconut or fresh fruit can make it even more special.
Can I make this recipe vegan?
This recipe relies heavily on eggs, milk, and condensed milk for its signature texture and flavor, so it’s not easily veganized without significant modifications. For a vegan version, you might need to look for a specialized recipe designed with plant-based ingredients.
How long does the cake need to chill?
For the best texture and flavor, chill the cake in the refrigerator for at least 3 hours, though overnight chilling is recommended. This gives the leche flan layer time to set completely and the flavors to meld beautifully.
Final Thoughts
This Ube Leche Flan Cake Recipe is truly a gem to have in your dessert repertoire. It brings together the best of Filipino flavors in a way that’s both comforting and impressive, perfect for sharing with friends and family. Once you try it, you’ll understand why it’s a beloved classic that never fails to bring smiles to the table. So go ahead, whip up a batch and experience the magic!
Print
Ube Leche Flan Cake Recipe
- Prep Time: 20 minutes
- Cook Time: 1 hour
- Total Time: 1 hour 20 minutes plus chilling time
- Yield: 8-10 servings
- Category: Dessert
- Method: Baking
- Cuisine: Filipino
Description
Ube Leche Flan Cake is a delightful Filipino dessert featuring a luscious layer of creamy leche flan topped with moist and fluffy ube (purple yam) cake. This elegant cake combines the rich caramelized custard with the vibrant flavors of ube for a unique and irresistible treat perfect for special occasions or as an indulgent everyday dessert.
Ingredients
Leche Flan
- 1 can (14 oz) sweetened condensed milk
- 1 can (12 oz) evaporated milk
- 6 large egg yolks
- 1 tsp vanilla extract
- 1/2 cup granulated sugar (for caramel)
Ube Cake
- 1 1/2 cups all-purpose flour
- 1 1/2 tsp baking powder
- 1/2 tsp salt
- 1/2 cup unsalted butter, softened
- 1 cup granulated sugar
- 4 large eggs
- 1 tsp vanilla extract
- 1/2 cup ube halaya (mashed purple yam)
- 1/2 cup whole milk
- 1/2 cup ube extract (or ube powder)
Instructions
- Prepare the Caramel for Leche Flan: In a small saucepan, melt the granulated sugar over medium heat, stirring constantly until it turns into a golden caramel. This caramel forms the base flavor of the leche flan layer.
- Pour Caramel into Pan: Immediately pour the caramel into the bottom of a 9-inch round cake pan, swirling to coat the bottom evenly. Set aside to cool and harden.
- Make the Leche Flan Mixture: In a large bowl, whisk together the sweetened condensed milk, evaporated milk, egg yolks, and vanilla extract thoroughly until smooth and combined.
- Pour Leche Flan Mixture: Pour the leche flan mixture over the set caramel in the cake pan and set aside while making the cake batter.
- Preheat Oven: Preheat your oven to 350°F (175°C) to prepare for baking the ube cake layer.
- Mix Dry Ingredients: In a medium bowl, whisk together the flour, baking powder, and salt to evenly distribute leavening agents and salt.
- Cream Butter and Sugar: In a separate large bowl, cream together the softened butter and sugar using an electric mixer or by hand until the mixture is light and fluffy, creating the cake’s base texture.
- Add Eggs and Flavorings: Incorporate the eggs one at a time into the creamed butter, mixing well after each addition. Then add vanilla extract, ube halaya, and ube extract and mix until fully blended.
- Combine Wet and Dry Ingredients: Gradually add the dry ingredients to the wet mixture while alternating with the whole milk. Mix gently until the batter is smooth and uniform in texture.
- Assemble the Cake: Carefully pour the ube cake batter over the leche flan mixture in the cake pan, spreading it evenly with a spatula.
- Prepare Water Bath: Place the cake pan inside a larger roasting pan. Pour hot water into the roasting pan until it reaches halfway up the sides of the cake pan. This water bath helps ensure gentle, even cooking of the flan layer.
- Bake the Cake: Bake in the preheated oven for 50-60 minutes, or until a toothpick inserted into the center of the cake layer comes out clean and the flan layer is fully set.
- Cool the Cake: Remove the cake from the water bath and allow it to cool in the pan for 10 minutes.
- Chill the Cake: Transfer the cake to the refrigerator and chill for at least 3 hours, or preferably overnight, to let the layers fully set and develop flavor.
- Unmold the Cake: Run a knife around the edges of the cake to loosen it. Place a serving plate over the pan and carefully invert to release the cake onto the plate, revealing the caramel top.
- Serve and Enjoy: Serve the Ube Leche Flan Cake chilled for a rich, creamy, and visually stunning dessert experience.
Notes
- Use a water bath (bain-marie) to gently bake the leche flan and prevent cracking or curdling.
- Ube halaya can be substituted with homemade mashed purple yam or purchased from Filipino specialty stores.
- Make sure to cool and chill the cake properly to allow the custard to firm up before slicing.
- For easier unmolding, run a knife around the edges while the cake is slightly warm but not hot.
- This cake is best stored covered in the refrigerator and consumed within 3 days for optimal freshness.


