
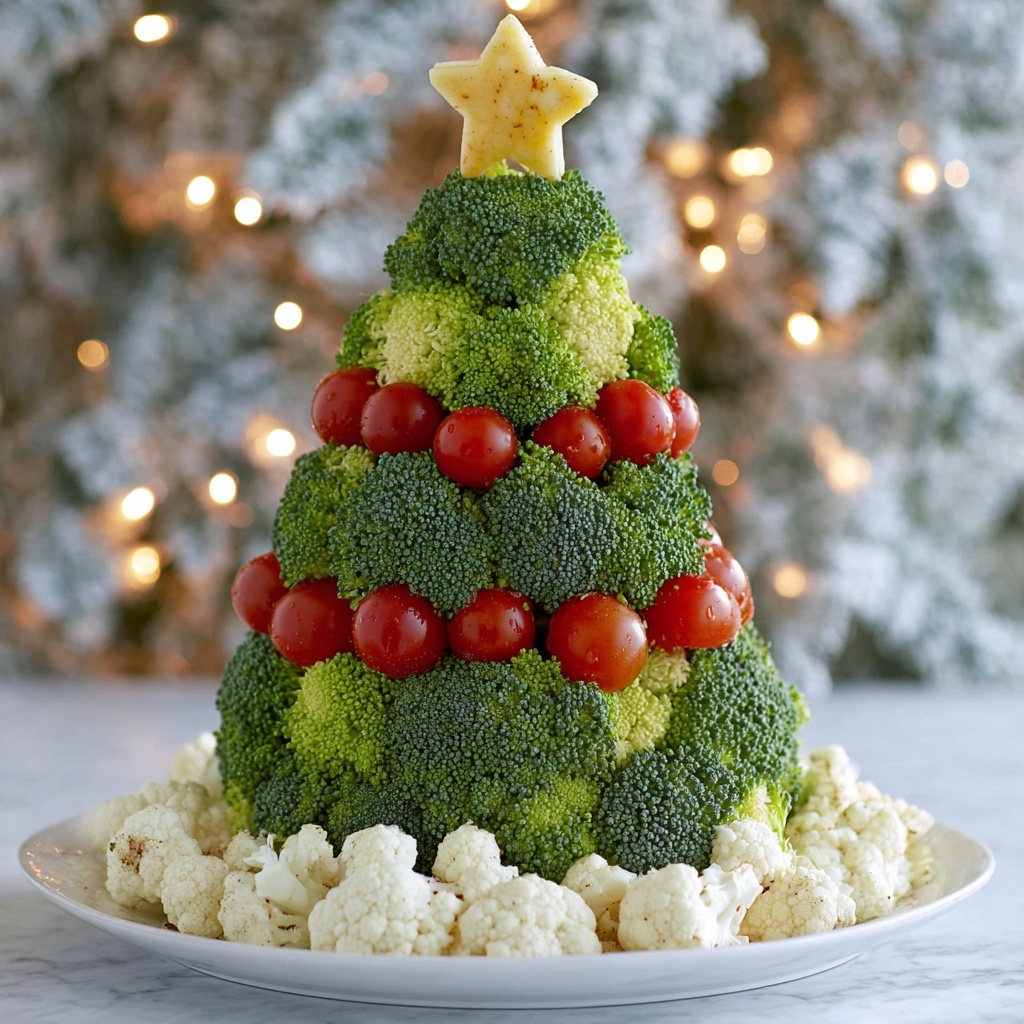
If you’re looking for a fun and festive way to bring color and crunch to your holiday table, the Vegetable Christmas Tree Recipe is exactly what you need. This vibrant, edible centerpiece not only looks stunning but is also a delightful mix of fresh veggies that everyone will love nibbling on. Perfect for parties or family gatherings, this creative take on a classic veggie platter transforms ordinary ingredients into a festive masterpiece that’s as enjoyable to make as it is to eat.
Ingredients You’ll Need
Simple ingredients are the heart of this Vegetable Christmas Tree Recipe, each playing a vital role in creating its vibrant look, fresh flavors, and satisfying textures. Together, they make this dish both visually appealing and absolutely delicious.
- Dry Foam 8.8″ Cone: Acts as the sturdy base that holds all the vegetables in place for that classic tree shape.
- Aluminum Foil: Wraps the foam cone for cleanliness and makes it easier to insert toothpicks securely.
- 24 oz Cauliflower Florets: Soft white “snow” surrounding the tree, adding a lovely contrast in color and crunch.
- 32 oz Broccoli Florets: The main “branches” of the tree, their rich green color brings the tree to life.
- 4 oz Cherry Tomatoes: Bright red “ornaments” that add pops of color and a juicy burst of flavor.
- 100 Toothpicks: The unsung heroes holding each vegetable piece securely on the foam.
- 4 oz Cheddar Cheese Chunk: Used to create a star-shaped tree topper, adding a creamy, savory note.
How to Make Vegetable Christmas Tree Recipe
Step 1: Prepare Your Vegetables
Start by washing all your vegetables thoroughly to ensure they’re clean and fresh. Once washed, lay them out on a clean towel or paper towels and let them dry completely—this helps the veggies stick better to the toothpicks and foam base.
Step 2: Wrap the Cone
Take your dry foam cone and wrap it fully in aluminum foil. This step keeps the foam clean and provides a sturdy, hygienic surface to insert your toothpicks and vegetables.
Step 3: Secure Vegetables to Toothpicks
Take each broccoli floret and cherry tomato, carefully inserting a toothpick into each piece. This makes decorating your tree much easier and allows you to space the vegetables beautifully as you go.
Step 4: Attach Broccoli to the Base
Begin placing your broccoli florets at the bottom of the cone, skewering each one into the foam. Work your way upwards, making sure to overlap the broccoli like branches on a tree. This layering creates a full, lush appearance.
Step 5: Add the Cherry Tomatoes
Periodically insert cherry tomatoes among the broccoli. These little bursts of red serve as festive “ornaments” brightening the tree and inviting eager fingers to reach for a tasty treat.
Step 6: Create the Cheese Star
Using a star-shaped cookie cutter or a small knife, cut a star from the cheddar cheese chunk. This cheesy topper adds a charming finishing touch and a delicious flavor contrast.
Step 7: Attach the Star Topper
Pop a toothpick through your cheese star and insert it carefully into the top of your veggie tree. This secures your festive star in place, completing the holiday look with a savory flourish.
Step 8: Surround the Tree with Cauliflower
Arrange the cauliflower florets around the base of the tree, simulating snowy ground and giving the display a polished and balanced look.
Step 9: Serve with Your Favorite Dip
Place the finished Vegetable Christmas Tree on your serving tray alongside a delicious dip. Whether it’s ranch, hummus, or your favorite creamy dressing, the dip makes this veggie tree even more irresistible.
How to Serve Vegetable Christmas Tree Recipe

Garnishes
Sprinkle fresh herbs like parsley or dill around the base for an extra touch of green and aroma. You can also add tiny edible flowers for a whimsical, elegant presentation that guests won’t forget.
Side Dishes
This Vegetable Christmas Tree pairs wonderfully with hearty sides like savory mini quiches or warm cheese fondue. Its crisp and refreshing crunch provides a perfect balance to richer, heavier dishes often served at holiday meals.
Creative Ways to Present
For an added wow factor, place the tree on a mirrored platter to reflect its bright colors or string tiny fairy lights around the base. Another idea is serving individual mini trees for guests as personalized appetizers they can snack on throughout the party.
Make Ahead and Storage
Storing Leftovers
Once assembled, keep your Vegetable Christmas Tree wrapped loosely in plastic wrap or covered with a damp towel to preserve freshness. Store it in the refrigerator and try to enjoy it within two days, as the veggies are best crisp and fresh.
Freezing
This recipe is best enjoyed fresh, so freezing is not recommended. The vegetables will lose their crispness and become mushy upon thawing, which detracts from the fun texture and look of the tree.
Reheating
Since this is a raw vegetable dish, reheating is unnecessary. Serve it chilled or at room temperature to keep that perfect crunch and maintain the vibrant colors that make the Vegetable Christmas Tree Recipe so delightful.
FAQs
Can I use other vegetables besides broccoli and cauliflower?
Absolutely! Feel free to get creative with colorful bell peppers, baby carrots, or snap peas. Just make sure the veggies are firm enough to stick on toothpicks and stay fresh.
Is it safe to use foam for food display?
Yes, as long as the foam is wrapped securely in aluminum foil and food only touches the vegetables and toothpicks, it keeps everything safe and hygienic.
How long does it take to assemble this recipe?
The actual assembly only takes about 15 minutes once your vegetables are washed and dried. It’s quick, easy, and super satisfying to watch it come together.
What kind of dips go best with this Vegetable Christmas Tree?
Ranch dip, hummus, tzatziki, or even a tangy blue cheese dip all complement the fresh vegetables wonderfully. Choose dips your guests love to create a crowd-pleasing combo.
Can this be made vegan or gluten-free?
Definitely! The Vegetable Christmas Tree Recipe is naturally gluten-free and can be vegan if you swap the cheddar cheese star for a vegan alternative or a star-shaped veggie slice like bell pepper.
Final Thoughts
Creating and sharing the Vegetable Christmas Tree Recipe is such a joyful way to celebrate the season with friends and family. It brings a burst of color and a fresh crunch to any holiday gathering, while letting you enjoy a healthy snack in festive style. Give it a try this year—you might just find it becomes your new holiday tradition!
Print
Vegetable Christmas Tree Recipe
- Prep Time: 15 minutes
- Cook Time: 1 minute
- Total Time: 16 minutes
- Yield: 6 servings
- Category: Appetizer
- Method: No-Cook
- Cuisine: American
- Diet: Vegetarian
Description
Create a festive and healthy Vegetable Christmas Tree using fresh cauliflower, broccoli, cherry tomatoes, and cheddar cheese for a fun and colorful holiday appetizer perfect for parties and gatherings.
Ingredients
Materials
- Dry Foam 8.8″ Cone
- Aluminum Foil
- 100 Toothpicks
Vegetables & Cheese
- 24 oz Cauliflower Florets
- 32 oz Broccoli Florets
- 4 oz Cherry Tomatoes
- 4 oz Cheddar Cheese Chunk
Instructions
- Wash and dry vegetables: Thoroughly wash the cauliflower, broccoli, and cherry tomatoes then allow them to air dry completely to ensure they adhere well to the cone.
- Prepare cone base: Wrap the 8.8″ dry foam cone thoroughly in aluminum foil to create a hygienic and stable surface for arranging the vegetables.
- Insert toothpicks: Stick a toothpick into each broccoli floret and cherry tomato to make them easier to attach to the cone.
- Build the tree base: Begin placing the broccoli florets at the bottom of the cone, attaching them by pushing the toothpicks into the foil-wrapped cone, covering the base fully.
- Add cherry tomatoes: Periodically insert cherry tomatoes among the broccoli to mimic ornaments and add festive color.
- Create the tree topper: Use a star-shaped cookie cutter or a knife to cut a star out of the cheddar cheese chunk, giving the tree a decorative and edible top.
- Attach star topper: Secure the cheddar cheese star to the top of the cone with a toothpick to complete the tree’s look.
- Surround with cauliflower: Arrange cauliflower florets around the base of the tree on the serving platter to simulate snow and add contrast.
- Serve: Present your Vegetable Christmas Tree with your favorite dip on the side for guests to enjoy.
Notes
- Make sure the vegetables are completely dry to prevent slipping off the cone.
- Use fresh, firm vegetables for the best presentation and structural integrity.
- You can substitute the cheddar cheese star with other cheese types or even veggies if desired.
- Serve immediately or cover and refrigerate for up to 4 hours to maintain freshness.


